|
Showing posts with label rules. Show all posts
Showing posts with label rules. Show all posts
TRICKS OF THE TRADE: A PLAYER'S AID FOR AVALON HILL'S 'WATERLOO'If it's not one thing, it's another. No sooner did I make the announcement on "Map and Counters" that I would shortly have a couple of new posts finished and ready to publish than my blog site "host", for reasons about which I am still unclear, took it upon itself to lock me out of the editing function of the "Blogger" dashboard. This meant that, not only could I not edit any of my existing posts, but I also could not access any of the unpublished essays that were currently stored on the dashboard in "draft" form. Needless-to-say, I was a tiny bit nonplussed by this unexpected and unwelcome hitch in my publishing schedule. 
 Waterloo Reinforcement Chart Play Aid PDF File HOME BREW: RECOMMENDED POST-PUBLICATION ERRATA FOR SPI’S ‘JENA-AUERSTADT’ (1975)INTRODUCTIONIn the course of preparing my recent posts on SPI’s JENA-AUERSTADT, I found myself rereading the turn-by-turn player comments from several of my old PBeM records of this title. These early exchanges were interesting both because they were pleasant reminders of enjoyable past contests, and also because they reminded me of a set of rules ambiguities that were — as far as I can determine, anyway — never addressed by SPI in any of its post-publication errata on the NAPOLEON AT WAR series of folio games. Because I and my opponents were experienced PBM players, we were pretty careful to work through these issues prior to play; ultimately, we came up with rules interpretations and/or clarifications that we felt were fair to both sides and (I like to hope) historically reasonable. Since these rules interpretations seemed to have worked out satisfactorily in both PBeM and face-to-face play, I have decided to share them with you, my readers, in the hope that you might find them personally useful.For simplicity’s sake, I have listed the original game rule first, then added the rules interpretation/clarification that I and my opponents, after some back-and-forth discussion, finally settled on. [16.21] The Effects of Fog (JENA-AUERSTADT Exclusive Rules) The Movement Allowance of all units is halved (round fractions down); artillery units may not attack unless the artillery unit is adjacent to the unit being attacked.  Recommended Rules Clarification: Although it is certainly possible for different players to hold opposing views when it comes to interpreting this rule, I and my opponents decided that the designer’s intent, in this case, was really to prohibit phasing units from expending MORE than half of their available movement points during any single movement phase of a “fog” game turn. Since fractions can be applied to road movement without requiring any “rounding” down, we decided that both sides should be permitted to expend 1½ movement points when travelling at least partly along roads. Consequently, here is recommended “Home Brew” rules interpretation: Players are permitted to move “3 point” units along roads (or some combination of road/off-road terrain) expending all 1½ of their available movement points, so long as this value is not exceeded and all other movement rules are observed. This rules interpretation, needless-to-say, benefits the slower-moving Prussians far more than the French, it nonetheless, seems both historically reasonable and completely logical within the larger confines of the game system. Also, I should add, it makes for a better, more interesting game. [7.72] Retreating and Advancing as a Result of Combat (NAPOLEON AT WAR Standard Rules) A retreating unit may not retreat into a prohibited hex, cross a prohibited hexside, or enter an Enemy controlled hex. If no hex is open to retreat into, the unit is eliminated.
Recommended Rules Clarification: Interpreting this rule, in one sense, is really not that problematical: assuming that both players accept a rather broad definition of the term “prohibited”, then retreats into what, based on normal movement restrictions, would be considered illegal hexes should not be permitted. The problem, of course, is that this rule really creates a “whose ox is being gored” situation for the opposing sides. This is because a strict interpretation heavily penalizes the Prussian player while leaving the French commander virtually unaffected; on the other hand, a more liberal interpretation tends to disproportionately benefit the Prussian player by negating one of the French army’s most important advantages: that of superior mobility. In the end, I and my opponents decided that, although retreating troops would almost certainly be able to retreat into terrain that would otherwise block a regular advance, they would, as a result, be so disordered as to lose unit cohesion. Since the original designer of the NAPOLEON AT WATERLOO Game System, James F. Dunnigan had previously addressed this very issue, I and my opponents decided to go along with the designer’s stated intent. Which is to say: years earlier, Dunnigan had explained that units eliminated in combat using the NAW grand-tactical game platform were really not to be viewed as having been completely destroyed; instead, he suggested that elimination, because of the one-hour time scale of the game system, should actually be seen as representing a battlefield outcome in which an affected unit had been disorganized to the point of being militarily useless. For purposes of retreat, any hex which requires more movement points to enter (for whatever reason) than a unit has available, at the instant of its retreat, is to be treated as a “prohibited” hex. Thus, if the only flight hex available for a retreating unit costs more movement points than the unit could otherwise legally expend during ordinary movement then the retreating unit is eliminated instead. Obviously, in the case of JENA-AUERSTADT, if both Dunnigan’s and the actual game designer’s intentions were taken into account, then it seemed clear that only one rules interpretation was really possible; that is: terrain costs, because of their potentially disordering effect on unit cohesion, should always be considered in determining whether a flight hex was legal or prohibited. This interpretation, although obviously hard on the Prussians, nonetheless seems consistent with the basic game system and, just as importantly, also seems to be completely plausible when considered from a purely historical point of view. A FEW FINAL THOUGHTS I am quite certain that more than a few of my readers will decide, upon coming to the end of this post, that this entire discussion has been little more than an extreme example of rules lawyerly “nit picking”. I completely sympathize with this viewpoint; unfortunately, having played many hundreds of PBM, PBeM, and face-to-face matches — usually with knowledgeable, seasoned, and skillful opponents — experience has taught me that legitimate rules disagreements have a tendency to arise where one least expects them. This, by the way, is the reason that the JENA-AUERSTADT rules examples listed above exist in the first place. Even in cases where a classic title has been around for decades and has been a popular mainstay of tournaments and gaming conventions for many, many years, rules disputes can, and occasionally do, unexpectedly crop up. That being said, my usual approach — and the one that I was trying to illustrate in the preceding paragraphs — is to attempt, insofar as possible, to clarify as many of the game’s more ambiguous rules cases as can be identified in advance of actually beginning play. This tactic, it must be admitted, rarely eliminates all potential areas of honest disagreement — particularly on less familiar, rarely played titles — but it does tend to identify the more important (and contentious) rules sections before they actually become a problem in the turn-by-turn progress of the game. In the end, of course, no set of rules can ever be so detailed and clearly-written that it eliminates every possible source of disagreement between otherwise well-intentioned and fair-minded opponents. Occasional rules problems simply go with the hobby. That being the case, it seems to me that when rules disputes do happen, the only truly reasonable approach is for the opposing players to work through their differences both logically and civilly, with the goal of arriving at a final interpretation that seems both truest to the designer’s original intent — something which, I grant you, is not always easy to determine — and to the historical record. What we are talking about here, after all, is only a game! Inevitably, taking this tack means that both players will, on occasion, have to yield to their opponent’s arguments; however, such an outcome, while sometimes disappointing, is nonetheless far superior to its alternative: an adversarial exchange in which both players allow a disagreement over the meaning of a few sentences in a rules booklet to degenerate into an unpleasant and vituperative squabble. Related PostsGAME ANALYSIS: SPI’s 1812 (HEX VERSION)This game profile is unusually long, even by my self-indulgent standards; for this reason, I suggest that those readers who are already familiar with the basic outlines of the 1812 game system, or those who are simply pressed for time, skip the first part of this essay and scroll down to the later sections, beginning with “Sitting Down to Play,” which deal with the scenarios and, more to the point, with the unique and challenging operational problems presented in grand-tactical 1812. It is in the last few sections of this profile that the structural elements that set this simulation apart from the other titles in the LEIPZIG family of Napoleonic games are examined in some detail. Finally, given my atypical (bifurcated) approach to this particular post, readers who work their way through this entire essay will note a bit of repetition because of the “interconnectedness” of several of the different sections on game mechanics and tactics; for this I apologize in advance. HISTORICAL BACKGROUNDA few months prior to the outbreak of war between France and Russia, Tsar Alexander Ist — in hopes, perhaps, of heading off the impending conflict with Napoleon — offered the following, surprisingly prescient, observation to the French Ambassador to the Court at St. Petersburg, the Duc de Vicence, Armand Augustin Louis de Caulaincourt.“If the Emperor Napoleon decides to make war, it is possible, even probable, that we shall be defeated, assuming that we fight. But that will not mean that he can dictate a peace. The Spaniards have frequently been defeated; and they are not beaten, nor have they surrendered. Moreover, they are not so far from Paris as we are, and have neither our climate nor our resources to help them. We shall take no risks. We have plenty of space; and our standing army is well organized … Your Frenchman is brave, but long sufferings and a hard climate wear down his resistance. Our climate, our winter, will fight on our side.”
The Tsar’s warning went, of course, unheeded in Paris, and on 22 June, 1812, the uneasy five-year peace between the empires of France and Russia finally came to an end. Napoleon, exasperated by Russia’s abandonment of the “Continental System” and suspicious of the Tsar’s barely-concealed, warming relations with England, had decided — through brute military power — to bring his fellow emperor to heel. No shots were fired on that day in June, yet the war might be said to have officially begun when a small troop of Polish cavalry first trotted up to an isolated stretch of the Niemen River in Central Europe. The newly-arrived horsemen’s interest in the Niemen was not accidental: they were a hand-picked band of mounted scouts dispatched to reconnoiter this particular section of the boundary between the Duchy of Warsaw and Holy Russia, and to determine if its banks were free of unfriendly eyes. However, besides being on the lookout for Russian patrols, the cavalrymen were also searching for something else: a safe site for a large army to pass over the Niemen and into the territory of Alexander the First, the Tsar of All the Russias. Moreover, this advanced party was in a hurry. A huge host — personally commanded by the French Emperor, Napoleon Bonaparte — comprised of some 240,000 men, 100,000 horses, hundreds of guns, and over 20,000 vehicles was following close behind. Thus, once a promising section of the river had been thoroughly reconnoitered by the Polish cavalrymen and found to be deserted, a messenger was sent galloping back to alert the main body and its commander that this stretch of the Niemen appeared to be unguarded. And given the importance of their mission, it was not long before the Polish horsemen were joined by the impatient French Emperor, himself, and a small carefully-selected retinue of officers and men.
Events now moved ahead very rapidly. Once both banks of the crossing point had been placed under the Emperor’s control, French sappers immediately jumped to the task of bridging the dark waters of the Niemen. Their work went quickly and, seemingly within hours, three pontoon bridges had been constructed across the river; as soon the sappers had completed their labors, the huge French army that had gathered west of the river began to pass over the Niemen and onto the soil of Holy Russia. The French crossing actually began on 23 June and would ultimately require four days to complete. Nonetheless, once it had begun, Napoleon immediately turned his thoughts to the next phase of his offensive: the finding, pinning, and then the complete annihilation of the, as yet, invisible enemy armies that, the French Emperor knew, waited for him somewhere to his front. The Russians, Napoleon was certain, would have no choice but to fight; thus, in the Emperor’s mind, only two important questions remained to be answered: where would they offer battle, and when? And on these two questions would hang the fate of the whole campaign. These, of course, were issues that would have to wait, and as the long French columns of men, vehicles, guns, and horses passed over the Niemen and into Russia, the decisive actions that Napoleon was sure he would fight were still in the future. In the meantime, it was clear that the French invasion had started out well, and despite an inauspicious fall from his horse at the beginning of the campaign, the French Emperor was full of optimism.
INTRODUCTION
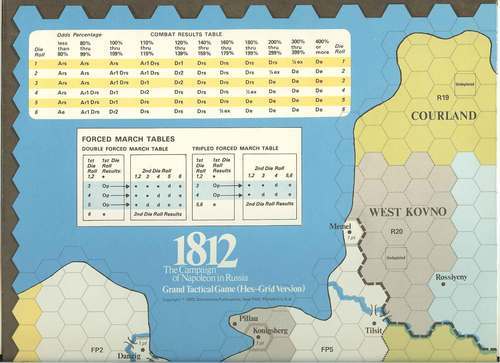
GAME DESCRIPTIONThe Components Viewed from the standpoint of contemporary gaming, 1812 is, without doubt, much more notable for the design work that it showcases than for its presentation or production values. In fact, components-wise, this early Napoleonic offering is pretty standard fare for early-seventies’ SPI games. Both the map and the Terrain Effects chart are printed on heavy-stock paper, while the clearly-written rules are presented in the compact, if somewhat awkward map-fold format that SPI tended to favor during the period before rules “booklets” made their wide-spread appearance. One nice feature of Simonsen’s design work on this title is that virtually all of the frequently-used tables (CRT, Forced-March, Attrition, etc.) are printed directly on the map surface. Since several of these charts are used by one or both players during almost every game turn, this both simplifies and speeds the flow of the game. I do, however, have two complaints about the graphics presentation of grand-tactical 1812. The first is that, although an ongoing tally of French Victory Points is critical to play, no Victory Points Track is included with the game. My second beef is that the Turn Record/Reinforcement Track is integrated directly into the body of the game’s rules, and is not printed on a separate piece of paper stock. These irritating little problems were probably the result of an attempt by SPI to cut overall production costs but, I personally find both of these omissions to be thoroughly irksome. In the end, I hand-drew a Victory Points Track; and after only a couple of attempts to use the Turn Record/Reinforcement Chart that actually came with the game, I decided to hand-draw a separate copy of this game track as well, so that I or my opponent could refer to the rules without having to fiddle either with waiting reinforcements or with the game turn marker. Excluding these two nits, however, the graphics and presentation of the grand-tactical version of 1812 combine, on balance, to form a game package that is both functional and yet still moderately attractive to the eye. Of course, far more important than the physical quality of a game’s components is how those components actually work to support the simulation’s basic design architecture. In the case of grand-tactical 1812, I am happy to say that they fit together very well indeed. Viewed from the standpoint of contemporary gaming, 1812 is, without doubt, much more notable for the design work that it showcases than for its presentation or production values. In fact, components-wise, this early Napoleonic offering is pretty standard fare for early-seventies’ SPI games. Both the map and the Terrain Effects chart are printed on heavy-stock paper, while the clearly-written rules are presented in the compact, if somewhat awkward map-fold format that SPI tended to favor during the period before rules “booklets” made their wide-spread appearance. One nice feature of Simonsen’s design work on this title is that virtually all of the frequently-used tables (CRT, Forced-March, Attrition, etc.) are printed directly on the map surface. Since several of these charts are used by one or both players during almost every game turn, this both simplifies and speeds the flow of the game. I do, however, have two complaints about the graphics presentation of grand-tactical 1812. The first is that, although an ongoing tally of French Victory Points is critical to play, no Victory Points Track is included with the game. My second beef is that the Turn Record/Reinforcement Track is integrated directly into the body of the game’s rules, and is not printed on a separate piece of paper stock. These irritating little problems were probably the result of an attempt by SPI to cut overall production costs but, I personally find both of these omissions to be thoroughly irksome. In the end, I hand-drew a Victory Points Track; and after only a couple of attempts to use the Turn Record/Reinforcement Chart that actually came with the game, I decided to hand-draw a separate copy of this game track as well, so that I or my opponent could refer to the rules without having to fiddle either with waiting reinforcements or with the game turn marker. Excluding these two nits, however, the graphics and presentation of the grand-tactical version of 1812 combine, on balance, to form a game package that is both functional and yet still moderately attractive to the eye. Of course, far more important than the physical quality of a game’s components is how those components actually work to support the simulation’s basic design architecture. In the case of grand-tactical 1812, I am happy to say that they fit together very well indeed.  Interestingly, the first thing that new players tend to notice about John Young’s design is the rather unusual look of the game map. For starters, the 22” x 34” four-color, hexagonal 1812 game map requires a separate partial map section to display part of the Baltic States and St. Petersburg, and for this reason, it requires a slightly larger table area than might otherwise be expected. Each hex is 25 kilometers from side to side. The actual geographical region depicted by the map roughly stretches from Thorn in the west, to Moscow in the east; and from St. Petersburg in the north, to Kiev in the south: an area that, in total, covers more than 1,500,000 square kilometers. What really gives the game map its distinctive appearance, however, is that the playing surface has been divided into 58 colored “Supply Areas” — roughly analogous to provinces — which play a critical role (more on this, later) in the game’s supply and attrition subroutines. Variations in types of terrain, considering the geographical scope of the game, are actually quite limited; in fact, almost all of the map’s playing area is devoted to Clear terrain hexes. Moreover, the effects on play of the few other terrain types that appear in the game are comparatively modest. All-Sea hexes and the region where the Pripet Marshes would ordinarily be displayed, for example, are off-limits to movement; unbridged River hex-sides cost one additional movement point to cross; bridged River hex-sides, on the other hand, may be crossed without penalty. Also, while I am on the subject of rivers in 1812: some players will immediately notice that the courses of many of the familiar rivers on the game map seem to have mysteriously strayed from their actual channels by dozens and even hundreds of kilometers; this isn’t a big thing so far as the play of the game is concerned, but it is a bit odd, nonetheless. In any case, only two types of terrain affect combat: River hex-sides (whether bridged or unbridged) and Fortress hexes. Units defending behind a river hex-side or within a fortress are doubled, and benefit from several other defensive advantages, as well. Interestingly, although important cities are noted on the game map they have no effect on movement or combat and, except for the single exception of Moscow, have no real effect on the play of the game. Because of the extended duration of the historical campaign, the effects of weather range from benign to severe; and the arrival of winter exerts a powerful influence on play during the last stage of the game. As evidence of this, beginning on game turn twelve (the first turn of winter), movement allowances for all units, combat or otherwise, are reduced by a single movement point. More importantly, the onset of winter also triggers very significant and onerous changes in the supply rules; and these winter-related changes, interestingly enough, penalize both the French and Russian armies equally.  The Game SystemThe movement rules in grand-tactical 1812, for those readers who are unfamiliar with the LEIPZIG Game System, are a bit unorthodox; moreover, they can also be more than a little nerve-racking. This is because players may choose, at any point during their movement phase, to increase the movement allowances of some or all of their units through the use of “forced-marches”. All units that can otherwise legally move, may, at the phasing player’s option, conduct a “double forced-march”. What this means, in game terms, is that a cavalry unit with a regular movement allowance of six movement points could potentially dash ahead expending twelve movement points instead of its regular six. This bonus, however, comes at a price: a die must be rolled for each unit attempting to forced-march; if the die-roll is successful, then the unit completes its march with no ill effects; if the attempt is unsuccessful, however, the unit may either have to abandon its forced-march attempt, or risk ending its move either disrupted or, if it is an infantry or cavalry corps, reduced to a weaker “division-sized” unit. Even worse is the fact that any non corps-sized units (that is: divisions, leaders, or supply trains) would, in such an instance, be completely eliminated and removed from the map. In addition to double forced marches, any infantry-type unit (only) may attempt a “triple forced-march; which means that an infantry corps can, with a good die roll, catapult itself forward fifteen hexes rather than its usual five. Not surprisingly, both the risks and the rewards associated with triple forced-marches are greater than for double forced-marches. That being said, forced-marches are, even if rarely employed, an important element in the game.The Zone of Control (ZOC) rules for grand-tactical 1812 will immediately be familiar to anyone who has played any of the other titles in the LEIPZIG series. All combat units — that is: cavalry and infantry, only — exert a zone of control into the six adjacent hexes; moreover, these units do not lose their ZOCs even if they are "disrupted" as a result of voluntary or involuntary retreats. These ZOCs come in two types: cavalry units (whether corps or divisions) exert a total zone of control; infantry units exert a partial zone of control. All units must halt upon entering a total ZOC and all non-cavalry units must halt upon entering a partial ZOC; however, cavalry units (only) may exit or even move through a partial ZOC by paying two additional movement points for each partially-controlled hex that they exit. Non-cavalry units that begin their movement phase may exit an enemy partial or total ZOC without penalty, but only so long as they do not move directly into another enemy ZOC. Cavalry units that begin their movement in an enemy ZOC may, of course, exit an enemy-controlled hex for an uncontrolled hex without penalty; in addition, however, they may also move directly from a partially-controlled hex directly into another enemy-controlled hex, but must end their movement (just like non-cavalry units) if the new hex is totally-controlled. Zones of control mutually extend into adjacent enemy-occupied hexes with only a single exception: Fortress hex-sides block ZOCs, and they do so for units both inside and directly adjacent to the fortress hex. Non-combat units (leaders, supply units, etc.) may freely stack and unstack without penalty; regular combat units, on the other hand, must pay one movement point to unstack and, more importantly, may not voluntarily stack with other friendly combat units unless the newly-assembled force attacks an adjacent enemy-occupied hex during the very next combat phase.
 In 1812, units will inevitably be lost and armies will be reduced in strength as a result of many causes: because of combat; from unsuccessful forced-marches; and from the lack of supply. However, there is one other element — besides the game’s unforgiving supply rules — that sets this historical design apart from almost every other simulation of its type; that is its inclusion of a special category of “attrition” casualties unconnected to any of the game’s other more conventional player actions. These losses — according to the game’s designer — represent the effects of a myriad of non battlfield-related misadventures and hazards, any of which might cause a soldier of this era to drop out of the ranks. To simulate this aspect of Napoleonic warfare, both players follow a similar procedure: at the beginning of every game turn, a die is rolled — after reinforcements have been placed on the map, but before the start of the movement phase — and the result is cross-referenced with the phasing army’s Attrition Table to determine losses (if any) for that game turn. Interestingly, only corps-sized units are affected; divisions — even if they are the only available (that is: infantry or cavalry-type) units on the map — are always immune to attrition results. What is particularly frustrating about these regularly-occurring attrition casualties is that neither player can really do anything about them. These randomly-generated losses, although usually very different in their impacts on the two armies, are built-in to the strategic framework of the game’s design. Not surprisingly, the cumulative effect of attrition on the two belligerents is enormous: as a rule, the French will tend to lose forces roughly equal to 75,000 men per month; the Russians — benefitting, in a sense, from the “home court advantage” — will only tend to lose, on average, the game equivalent of about 25,000 men per month. The damage that these “extra” casualties wreak on the combat capabilities of the two opposing armies, particularly as the campaign wears on, is difficult to overstate. Napoleon might conduct a flawless campaign and never lose a single unit in combat or on the march and yet, by the end of the last turn of the game, still see almost two-thirds of his army (the equivalent of 475,000 men) in the “dead pile.” Clearly, attrition losses — of one sort or another — are represented, to one degree or another, in a number of other Napoleonic-era simulations; in 1812, however, this strategic factor plays a far more important role than it does in most other simulations. In fact, in this game, attrition is more than an aggravating and unpredictable source of casualties; instead, in 1812, attrition losses actually help to drive the pace and tempo of the game. Leader units, in the grand-tactical version of 1812, play an important combat role in the game because they increase the offensive or defensive strength of the combat units with which they are stacked. Depending on the bonus ratings of the individual leader this can either be inconsequential: the Russian general Sacken, for example, has a combat value of 1/1; or enormous: Napoleon’s value is 25/25. What this actually means when it comes to play is that Napoleon, if stacked with a French force of twenty-five combat factors, would double the force’s attack or defense strength to fifty combat factors. [Please note: how these bonuses are to be computed in combat situations in which the defender is doubled can be a little sticky: a strict reading of the post-publication 1812 errata would seem to imply that the leader bonus does not benefit from terrain effects; however, this interpretation is both a little murky and very punishing to the already disadvantaged Russians. For this reason, I strongly urge that players treat leader bonuses exactly the same as the strength of combat units when it comes to terrain modifiers (that is, for example, to treat the doubled defensive value of an infantry corps stacked with Essen as 18, rather than 14 defense factors) . This minor "tweak" may not necessarily be correct, but it will certainly make for a much better game.] Over and above this specialized combat role, however, leader units possess certain unusual characteristics that make them extremely useful for other, non combat-related tasks. A more detailed description of these additional capabilities and missions, however, will not be offered at this time, but will be taken up later, in a separate section of this essay. Victory Conditions
SITTING DOWN TO PLAY
Once players have thoroughly familiarized themselves with the grand-tactical 1812 game system by playing through Scenario #3 a few times, they will usually want to move on to one of the longer, earlier scenarios. Of the three different situations presented by the designer, Scenario #1 (the full campaign game) is my personal favorite despite its longer playing time. Unlike the second two scenarios, the campaign game allows the players a great deal of latitude when it comes to their respective game strategies. This, for me, is its greatest advantage over the other, shorter scenarios. The other major appeal of Scenario #1, at least from my standpoint, is that, because it begins with the Russian moves just prior to the start of the French invasion, it leaves both players free to make their own mistakes. And, with nineteen game turns to be played, the opportunities to make mistakes are plentiful, indeed. NOTES ON TACTICSThe LEIPZIG Game System — besides doing a nice job of modeling many of the key aspects of Napoleonic warfare — is also clean, logical, and comparatively easy to learn. This is probably why SPI chose to stick with this basic game platform in two of its other grand-tactical level Napoleonic titles: the (hex-based) version of 1812 being discussed here; and the more ambitious and richly-detailed simulation of the campaigns of 1805, 1806, and 1809, LA GRANDE ARMÉE (1972). Interestingly, each of the three LEIPZIG-based games possesses idiosyncrasies that, to varying degrees, directly affect its play. Grand-tactical 1812, like its cousins, is no exception. That being said, what follows are a few observations and tips — based on many hours spent playing and studying this particular game — aimed at helping new players (or old ones who are disposed to give this title another look) to become more comfortable with the sometimes unusual design features that characterize 1812. One final caveat: the following remarks are valid for all three of the game’s scenarios, but their main focus is really on the nineteen-turn Campaign Game. Scenarios #2 and #3 are both interesting and eminently playable; but it is Scenario #1 which, I personally believe, really does the best job of conveying — at least, in game terms — the strategic ebb and flow of Napoleon’s 1812 campaign.The Opposing ArmiesThe two armies that confront each other on the 1812 game map are virtually identical as regards the characteristics of their component combat units: all infantry corps in the game, for example, are 5-5s, and all cavalry corps are 3-6s. Where the French and Russian armies really differ is in their respective operational capabilities and — for much of the game, at least — their actual combat power. Moreover, both sides begin the game with all of their units assigned to specific map hexes that more or less replicate the two combatants’ historical starting locations. Napoleon’s Grande Armée starts Scenario #1 with eighteen infantry, nine cavalry corps, fourteen leaders, and four supply trains: most of which are deployed in a sweeping arc that extends from the city of Memel on the Baltic, to the Polish city of Lublin in the south. To oppose this intimidating hoard of French and Allied troops, the Russian commander can initially call on only seven infantry corps, five cavalry corps, six leader units, and two supply trains; furthermore, this already outnumbered force is rendered even less combat-effective than its numbers might suggest because of its deployment in a line of outposts stretching from Riga in the north, all the way to Brest-Litovsk in the south. Thus, given both its raw numbers and its initial deployment, the Russian army starts the game in a genuinely precarious position; however, the good news for the Tsarist player is that his situation — barring excessive (and unusual) Russian forced-march, attrition, or combat losses during the early turns — should gradually improve as the game wears on. The Russian army — when it comes to preserving and accumulating combat strength over time — enjoys two significant, built-in advantages over the French: a much lower attrition rate, and a significantly higher reinforcement rate. And these two factors, in most games, should combine to slowly, but inexorably narrow the raw numerical gap between the two opposing armies. In spite of all this, however, the Russians can still expect to be heavily-outnumbered almost everywhere on the map for at least the first half of the game.
Because most of the characteristics that separate the two opposing armies in 1812 are fairly obvious, it is easy to overlook a less noticeable difference that, on its face seems relatively minor, but in truth, is probably the most significant one of all: the contrast between the French and Russian mobile supply trains. Only a handful of these specialized units actually appear in Scenario #1; nonetheless, their strategic importance cannot be overstated. The Russian disadvantage in this area starts with the numbers. Napoleon’s army begins the game with four supply trains; the Tsar’s army starts with two; and neither side receives any more as reinforcements once the game begins. Thus, the French army opens its campaign with twice as many supply trains on the map as the Russian army: an advantage that, in itself, allows the advancing Grande Armée a great deal more flexibility in its logistical arrangements than the supply-challenged Russians. Putting aside the discrepancy in numbers, however, the two sides’ mobile supply units are, in many other respects, comparable. The supply trains for both armies, for example, are identical in terms of their movement and (parenthetical) defensive combat ratings, and they also share the same ability to immediately 100% deplete any supply area that they occupy at the end of their movement phase (the key, by the way, to virtually any effective Russian defensive strategy, particularly during the early game turns). In addition, both French and Russian supply trains can, if conditions are right, project supply from a 50% depleted or totally undepleted area to neighboring friendly combat units in an adjacent 100% depleted area. However, here the similarities end. Where the Russian logistical capabilities really suffer in comparison to that of their French adversary is in the area of depots: the French supply trains can completely strip an undepleted area and, if the French commander desires it, create a depot unit; the Russian army’s supply units cannot. The impact on play of this unique French capability is enormous: each French depot can supply up to five friendly combat units (any size) indefinitely; and even more importantly, although a depot unit cannot move on its own, it can be carried along by a supply train as the mobile supply unit accompanies Napoleon’s army forward. What this really means for both players is that, while the Tsar’s forces can usually delay the French army by totally depleting one supply area after another as they retreat to the east, such a “scorched earth” strategy can only slow Napoleon’s pursuit, not stop it; in most cases, to actually halt the French advance, the Tsar’s army will, at some point in the game, have to turn and give battle. Happily for the Russian commander, there is at least one aspect of the 1812 game system in which his army actually enjoys a noticeable edge over that of his foe; that is in the area of reinforcements. The Tsarist commander will, as the game progresses, receive fourteen new corps and five leaders, versus only six incoming corps and two leader units for the French. Moreover, along with this better than two-to-one superiority in fresh, incoming units, the Russian player also enjoys a great deal more latitude than his opponent when it comes to where his newly-arriving corps and leaders can be brought into play. And this is not a trivial advantage. In the case of the French army, reinforcements may enter the game only from the western map edge. The majority of reinforcing Russian units, on the other hand, may enter play either along the eastern map edge or, far more handily, at any friendly fortress that is not currently besieged and that has never been passed through by an enemy unit. In essence, what this means is that French reinforcements will mainly serve as attrition-fodder, while newly-arriving Russian infantry corps will often be able to pop into existence right where they are needed most. And there is yet more good news in this department for the Tsar’s army: in addition to these flexible reinforcement arrivals, the Russian player also receives three special contingents of incoming forces: one group which enters at any hex (unoccupied by a French unit) along the north edge of the St. Petersburg map insert; and two other contingents which both enter play at any open hex or hexes along the southern map edge in Russia. [Interestingly, these units were originally allowed to enter play in Austria as well as Russia, but the "Austrian option" (sadly, for the Russian player) was eiminated in subsequent errata.] Needless-to-say, it is these two southern groups that create the most problems for Napoleon’s army because, unlike all other Russian reinforcements, these units may move into Austria if the French commander fails to block their movement west. Hence, although the French player can deal with this two-staged threat to his southern flank in a number of different ways; deal with it, he must. And any response that the French commander decides on — if it is to be effective — will probably require that he deploy at least four or more combat units, plus a few leaders, in the far south where they will be far removed from the main action of the war for at least the first half of the game.
What’s a Player to Do?
The Russian player, because he is the first to move in 1812, is in a unique position to control both the initial direction and the tempo of the game. Moreover, in spite the French army’s overwhelming starting advantage in combat power, the Russian commander need not adopt a purely passive strategy and simply fall back during his first movement phase. Such a conservative approach may be the Russian player’s safest course of action; it may even be his best overall strategy; but it is, most certainly, not his only alternative. In fact, for the offensive-minded Russian commander who occasionally likes to completely disrupt the carefully-laid plans of his opponent, several intriguing options are available that permit him to take the fight to Napoleon on the very first turn of the game. Two examples of these high-risk, hyper-aggressive Russian openings are particularly interesting and, because of their very real differences, also serve to illustrate this point about player options very nicely. The first of these, I will call the “Death Ride” opening; the second, the “Dash into Austria” gambit.
Of course, in most games, the Russian player will prefer to be a bit more cautious in the early game turns. In this case, a typical conservative opening move will often end with the Russian commander establishing a line running roughly from Dunaburg in the north to the Pripet Marshes in the south. To fill in the southern section of this line, the three units in the Bialystok salient can all force-march into the Minsk area where they will be joined by the infantry corps that begins the game in Lida. If the Russian player is lucky, he will finish his first-turn move with four corps each, in both Svir and Minsk. This also means that the Russian commander will be able to 100% deplete the Drissa and Riga supply areas using his two supply trains, while — thanks to the four corps deployed in the two other areas directly in Napoleon’s path — he will also be able to 50% deplete Svir and Minsk by the end of turn one. On game turn two, the main Russian army in the center will resume its eastern withdrawal, depleting (when possible) one supply area per turn as it goes. This Russian “retreat-deplete” strategy will typically continue for much of the first half of the game. However, there will come a point in most games — most often between game turns nine and eleven — when the main Russian army will have finally assembled enough combat power (five or six infantry corps, three or more cavalry corps, and all leaders except for Essen and Tormassov) to enable it to turn and strike back at Napoleon’s vanguard. This battle will usually, but not always, be fought somewhere in the vicinity of Smolensk, Kaluga, or Vyazma (the reasons for this will be discussed in more detail in a later section of this essay); but, because both sides will be expecting it, this clash will almost never result in a short, quick fight. Instead, the Russian counterattack — particularly when launched against a careful and resourceful French player — will most likely lead to a multi-turn slugging match; and, barring dramatic events elsewhere on the map, the outcome of this protracted engagement will likely determine the ultimate success or failure of Napoleon’s campaign. The French player, predictably enough, begins 1812 with his own share of interesting strategic alternatives. And, although Napoleon’s early moves will largely be shaped by his effort to balance the conflicting demands of reliably supplying his army’s advance against his need to rapidly acquire additional Victory Points, the decisions that he makes at the start of the game will be hugely important in shaping the future focus and scope of his army’s operations. Given his starting set-up and the geography of the battle area, some aspects of the French player’s overall plan of campaign are virtually baked into the game. A substantial part of the Grande Armée, for example, is always going to march straight up the middle because that is where the bulk of the army starts and that is where the majority of the Victory Points are. Where the French player is actually going to have to make choices between competing options is around the strategic “edges” of his main plan of campaign. And this is also where things can get interesting. When the French player sets about planning his army’s future operations, there is no doubt but that some of his options will seem more appealing than others. Nonetheless, given the scope and unpredictable nature of 1812, he will still have his share of difficult strategic choices to make. For instance, should the French commander gamble on an early try for St. Petersburg in the far north, or should he, instead, make a quick, but risky dash for ancient Kiev in the south? What about the several, early-game threats to his flanks from Russian reinforcements? How many units should the French player detach to protect his fortresses in the south during the turns when those Victory Points holdings are most at risk; how about those in the north? Or should he just leave token forces to cover his flanks and, instead, make a massive effort against distant Moscow, capturing the Russian fortresses that line his route, as he moves east? And, as if the French player’s life wasn’t complicated enough already, there are also the turn-by-turn operational details of his campaign. Where on the map, for example, should he assign his various leaders; and how should he handle his inevitable attrition losses? And what approach should he take to forced-marches; which is to say: Is it more profitable for the French army to race forward in an early attempt to trap and destroy a few extra Russian units when the enemy is still at his weakest; or should Napoleon conduct a slower, more methodical advance, so that when the inevitable showdown with a resurgent Russian army finally comes, his main force is as strong as possible? All of these decisions are important, and none of them are easy. Clearly, if the examples cited above illustrate anything at all, they show that both the Russian and the French players begin 1812 with a variety of interesting strategic alternatives from which to choose. Some of these options will, needless-to-say, see more use than others in the course of regular play; but virtually none of them are completely without merit. What this really means is that while most games of 1812 will tend to develop along fairly predictable lines, the game system is both textured and flexible enough that it never completely loses its capacity to surprise. And it is this built-in uncertainty that helps to create both the competitive challenge and the tense excitement of the game. Forced Marching
In the case of leader units, a player’s urge to resort to forced-marches will usually arise in response to an impending attack. Most likely, this will occur when the phasing player — having already assembled a powerful stack of combat units — finds that he still needs to augment his battle strength in order to achieve the odds that he wants, and the only way that this can be accomplished is by rushing a distant leader or two into the action. There will, on rare occasions, be battles that are crucial enough to justify taking such a risk; more representative of these situations, however, is one in which the would-be attacker has (without really thinking) impulsively committed his forces to a fight that could just as easily have been postponed for one more game turn. Even in those rare cases when forced-marching a leader into a battle might actually be justified, because the combat bonus values of the various leaders differ, some leader units will still be better candidates for forced-marches than others. The Napoleon leader unit, not surprisingly, represents a special case: because it is worth 5 victory points (as much as either Moscow or St. Petersburg), it should never, barring an extraordinary battlefield emergency, be risked in a forced-march. Obviously, if forced-marching a leader unit is usually a bad idea (except, of course, to avoid certain elimination), it is even a worse idea to force-march a supply train. In spite of this fact, however, there will still be times during a typical game when both players will probably choose to force-march these extremely valuable units: the Russian commander from necessity; the French player from a desire to improve his offensive prospects. The situations in which the Russian supply trains are most likely to be risked in this way are: first, when the supply unit at Riga attempts (usually on game turns one or two) to force-march north into the Livonia supply area in order to avoid being trapped and destroyed by the rapidly advancing French; and second, when the Russian supply train on the central front seeks to avoid a French ambush by force-marching from the safety of the fortress of Polotsk to that of Vitebsk (typically on or about turn three). The French player will usually seriously consider force-marching a supply train in one of two situations: the first is when, during the early game turns, he decides to hurry the supply units in Danzig and/or in Warsaw east in order to support the army’s advance; the second is when, during the last few game turns, an opportunity presents itself to force-march one of his forward supply trains into a supply area containing a sizeable contingent of Russian units in order to 100% deplete it. One final point needs to be made when it comes to forced-marching leaders and supply trains, and that is this: the unexpected loss of a leader will always be painful, but, except for the elimination of the Napoleon unit, rarely will it be fatal; the loss by either player of a single supply train, on the other hand, will almost always be a strategic blow, if not an immediate and decisive game changer.
The Supply RulesNapoleon, talking about the importance of supply, once observed that: “An army marches on its stomach.” In a very real sense, Napoleon’s observation, colorful though it may be, describes both a military truism and the central theme of 1812. In this game, as in the actual campaign, protracted, large-scale military operations are virtually impossible without adequate logistical support. For this reason, no player should expect to be successful who is not absolutely fluent with every aspect of the 1812 supply rules. Let me stress this point, again: in this game, more than almost any other that I can think of, the rules governing supply — complicated and detailed though they may be — are simply too crucial both to the fundamental design and to the “spirit” of the game for players not to take the time to master them completely. And, although a fairly-detailed outline of the game’s supply rules appears in the “Game Description” section of this essay, there is one supply-related topic that is, I think, well worth considering further: the important, but somewhat different strategic roles that the two armies’ supply trains play in grand-tactical 1812; because, in a very real sense, these six (two Russian and four French) units control the rhythm of the entire game.However, before actually moving on to a discussion of the specific game functions of the two sides’ supply trains, I think that it would be useful to spend a little time on one particular aspect of the supply rules that — I have found, at least — seems to be either misunderstood or misinterpreted by a surprisingly large faction of otherwise knowledgeable players. This misunderstanding arises because of a difference between the supply function of “supply areas” and that of French “supply depots.” In the case of the map’s differently-hued “supply areas,” supply usage is computed based on the number of CORPS-SIZED units that occupy each area at the end of the game turn. What is important about this turn-by-turn process is that only the combined totals of all occupying infantry and cavalry corps are counted against an area’s supply capacity, NEVER the number of divisions. This means, in essence, that any number of division-sized units can cluster in the same supply area without causing any depletion effects whatsoever. The rules governing the use of French depot units, on the other hand, are not nearly so liberal. For example, a French depot may supply, without being expended, up to five units of any size, assuming that the five units in question all occupy the same supply area as the depot. The key difference is that, while divisions are irrelevant to capacity totals in supply areas, they count just like corps do against the supply capacity of a depot unit. This may seem like a trivial difference, but it can be important, particularly during the winter game turns when both movement allowances and area supply capacities are reduced. It can also have a significant impact on play when multiple retreats unexpectedly swamp the capacity of either a supply area or a French depot. Now that our brief “supply areas versus depots” rules detour is out of the way, let us turn back to the more important subject of the different roles of the French and Russian armies’ supply units in 1812. And since the Russians are the first to move, it is probably easiest to begin with a discussion of the Tsar’s supply units, before moving on to consider those of the French army. The Russian player, the reader will recall, starts the game with two widely-separated supply trains: one in Riga, and the other in the Dvina River fortress of Drissa. In the case of the Riga supply train, the most conservative and also probably the best use for this unit is to create a logistical “moat” between the northern wing of the French army and St. Petersburg: it does this by depleting, first the Riga, and then the Livonia supply areas on turns one and two of the game. If the French player declines to dispatch a force in its pursuit (a strong possibility, given that the pursuers will have a 50% chance of elimination due to lack of supply), the Riga supply train continues its retreat north into Esthonia where it (hopefully) rejoins the other two members of the original Riga garrison. Needless-to-say, the depletion of the two supply areas that lie between the Dvina River and Esthonia, and the threat of depleting yet a third area (Esthonia), should be enough to discourage all but the most optimistic of French commanders from dispatching an expedition towards St. Petersburg. This is not to say, by the way, that the Riga-Livonia-Esthonia sequence of moves is the only course open to the Russian commander; only that it is probably the safest. And safety, in the case of both of his precious supply trains, should be uppermost in the mind of the Russian player. An early misstep with the Riga supply train can have very unpleasant consequences for the Russian commander; a mistake with the Drissa supply unit, on the other hand, is even worse: it can lose the game. The greater strategic importance of the Drissa supply unit derives from the fact that, of the two Russian supply trains, it is only the Drissa unit which allows the Russian player to effectively delay Napoleon’s advance in the center during the critical early game turns when the strength disparity between the two armies is at its greatest. To accomplish its crucial mission, the Drissa unit retreats turn-by-turn from one supply area to the next — usually in the following sequence: Drissa-Polotsk-Vitebsk-Orsha-Smolensk — depleting each of these supply areas as it goes. Once Smolensk has been 100% depleted, typically at the end of turn five, this Russian supply unit then retires to the relative safety of the Kaluga area. At this point in the game (usually on or about turn six), the role of the Drissa supply train changes: from now on, its mission will no longer be to deplete the supply areas in Napoleon’s path, but instead, to provide much-needed logistical support to the combat units that make up the main Russian army. Moreover, such support will really be indispensible when it comes time to actually fight the French. The reason for this is simple: the presence of the supply train permits the Russian commander to support up to six corps during summer game turns and three corps during winter turns in or from any single undepleted area without causing the supplying area to be depleted. This is true — whether the affected corps are relying for supply on the same or an adjacent area — so long as the Russian supply train supporting them is undisrupted, and the affected units are drawing their supply from an otherwise viable supply source.
From this point forward in the game, how the French player chooses to utilize his advanced supply trains (all, of course, still accompanied by depots) will depend on two factors: the outcome of the Battle of Smolensk, and the size of the Grande Armée compared to that of the Russian army. If the French army received a serious check at Smolensk, then Napoleon may well opt to hunker down and concentrate on preserving the Victory Points he already has. On the other hand, if the Russians are still in retreat, and if he still has enough cavalry left to screen his front and flanks, then the French player will want to advance on a broad front; in the process, pushing the Tsar’s forces into a steadily narrowing belt of undepleted supply areas near the east edge of the map. This final drive will usually create opportunities for the French player to use his supply trains in a completely new way: to indirectly attack the Russian army by eliminating its remaining sources of supply.
Attrition
Needless-to-say, most players, after examining the 1812 attrition rules, will assume that attrition invariably hurts the French and helps the Russians. Based purely on the “Laws of Large Numbers,” this view makes perfect sense. Unfortunately, nineteen — the number of attrition die-rolls each player will make in a complete game of 1812 — is not a particularly large number. Thus, it occasionally happens that, in the course of a particular game, the random distribution of attrition outcomes will vary widely from the mean, and the attrition effects that the Russian player counted on, and the French player dreaded prior to the beginning of play, will turn out to be very different from expectations. This can have an interesting effect on the interactive dynamic of the simulation. Because a typical game of 1812 will tend to produce very few major battles — as was the case, by the way, in the actual campaign — the number of casualties caused by the attrition die-rolls will often replace combat as the arbiter of each side’s good or bad luck. What this means, in terms of the game’s participants, is that attrition results can often have an exaggerated effect on player morale. Moreover, the sheer randomness of each player’s attrition losses, over time, has another, somewhat unexpected, but positive effect on the game: it tends to make each playing of 1812 an unpredictable and therefore, uniquely different gaming experience. FortressesIt is an interesting, if unexpected feature of John Young’s simulation of Napoleon’s invasion of Russia that fortresses — extremely important both as sanctuaries and as defensive strong-points in all of the other LEIPZIG-inspired games — are actually almost valueless to the defender in the case of this game. The main reason for this weakness is that, in 1812, fortresses only double the defense strength of their garrisons while fortresses in both LEIPZIG (1972) and LA GRANDE ARMÉE (1972) triple the defensive value of their occupants. I should note that, in the original grand-tactical 1812 rules, fortresses also tripled the defense strength of their garrisons; this defensive multiplier, however, was reduced from triple to double in the game’s post-publication errata. And as if this reduction wasn’t enough, special limits on stacking and supply further undermine the usefulness of fortresses in 1812.Consider the following: in both LEIPZIG and LA GRANDE ARMÉE, players are permitted to voluntarily stack — without expending either combat or stacking supply — the equivalent of one army (that is: up to eighteen combat factors) in a single fortress hex; just as importantly, fortresses in these two games also serve as a supply source for a garrison (of any nationality) of this size, or less. The fortress rules in 1812, on the other hand, are far more restrictive. For example, under most circumstances, only one combat unit (of any size) may voluntarily occupy a fortress hex. Please note, however, that there is one important exception to this prohibition: additional combat units may stack in a friendly fortress if, and only if, they have entered the fortress hex as a direct result of a retreat result; this is because the retreat rules always require that retreating units move towards and, if possible, halt once they have entered the nearest friendly-controlled fortress. This even applies if the results of multiple retreats would cause the affected units to violate the regular stacking rules. In addition, fortresses in 1812 may only serve as a supply source for a single combat unit, and then, only if the unit both belongs to the fortress’ original owner, and the fortress in question has never, at any point in the game, been controlled by the opposing side. In those cases in which there are additional combat units in a fortress, then these extra units must be supplied by other, alternative, means. The cumulative effect of these changes is to make fortresses in 1812 pretty nearly indefensible when confronted by a moderately powerful enemy force (four corps or more) which is also accompanied by a few reasonably good leaders. The reason for this is simple: the stacking rules virtually guarantee that, under ordinary circumstances, the most powerful fortress garrison possible will never exceed 10 defense factors (5 combat factors plus 5 leader points) which, when doubled, presents a far from intimidating adjusted defense strength of only 20 factors. And because a 2-to-1 attack — even taking into account the special rule exempting fortresses from retreat and exchange results — yields a two-thirds chance of success for the attacker, only rarely will a player (usually the Russian) risk a garrison in what would almost certainly be a suicidal mission. “Rarely,” however, is not the same as “never,” and, when it comes to at least two key fortresses, the Russian player will very likely elect to stand fast rather than retreat even when faced with the certainty of powerful French attacks. And the two friendly-controlled fortresses that the Russian player will almost always choose to fight for are Smolensk and Kiev. In the case of Kiev, a determined Russian defense of the Dnepr fortress is likely for two reasons: first, because it is worth three Victory Points; and second, because the French attack will usually not develop until the middle-game; thus, the longer the Russian garrison can hold out in Kiev, the fewer game turns the French player will have left in which to march his southern units east to reinforce Napoleon’s main body in the center. Both of these reasons, because they are essentially strategic in nature, usually have little to do with developments elsewhere in the battle area.
Given the importance of the actions around Kiev and Smolensk, the game will usually reach its tipping point, as noted previously, sometime between turns nine and eleven. This is because, if Napoleon does not capture either Smolensk or Kiev by game turn eleven, then he faces the unpleasant prospect of French “political” losses being added to those from regular attrition; thus, from the middle-game on, the threat of extra “politically-induced” casualties will become an ongoing worry to the French player because he will already be averaging a loss of about one corps per turn from regular attrition. In terms of the game’s victory conditions, Napoleon can win the game without capturing Smolensk; he just cannot win it decisively. Finally, as an interesting aside: although, strength permitting, it will usually make strategic sense for the Grande Armée to pursue the Russians all the way to the eastern map-edge, the game’s victory conditions do not require that the French player duplicate Napoleon’s route of advance and capture Moscow in order to win. Instead, to achieve a Decisive Victory, the French player only needs to seize and maintain control of twenty-two Victory Points hexes — essentially, every fortress west of, and including Smolensk — by the end of the last game turn. Thus, although the capture of Moscow may well add a little historical “garnish” to the French player’s campaign, it is not really necessary. "General Winter"
The truth of the matter, however, was that the undeniable miseries experienced by the retreating French were as much the result of an almost total (but at least partly preventable) breakdown in Napoleon’s logistical arrangements, as they were the result of the awful Russian climate. Somewhat surprisingly, the Russians — because the Tsar’s commissariat service was both utterly corrupt and totally incompetent — suffered almost as badly as the French; this, in spite of the Russian soldiers’ native hardiness and their long experience with their own country’s harsh winters. In actual fact, both armies endured incredible hardships during the winter portion of the campaign; and it turned out that, contrary to Napoleon’s repeated excuses, the brutally cold weather of the Russian winter was really neither side's ally.
Leaders
For starters, because they are not considered combat units, leaders in grand-tactical 1812 cannot be lost either through attrition or from lack of supply. This ability of leaders to move safely into or through 100% depleted supply areas is not a trivial matter, as will shortly be seen. In addition, leaders in 1812 — unlike comparable units in every one of the other LEIPZIG-based titles — cannot be disrupted either as a result of battlefield defeats, forced-marches, or retreats before combat. This unique trait is important because it allows both players to use their respective leader units to block enemy movement or even to help shield friendly positions from attack. Leaders employed in this way, for instance, can be positioned next to a friendly-occupied fortress in order to deny a critical hex either to enemy units attempting to pass adjacent to the fortress, or to a hostile force marching up to attack. Even more importantly, however, leader units can assist friendly cavalry in creating an impenetrable line of units and totally-controlled hexes. When used in this way, leaders are positioned in intermediate hexes in a diagonal line of cavalry in order to extend the length of an AV-proof defensive screen. This specialized use of leader units is especially handy for extending the effective reach of a friendly cavalry screen on an army’s flanks. Interestingly, one often-overlooked, but particularly useful role for leader units in 1812 is for them to be dispatched into the enemy rear as unsupported “raiders.” Since an ungarrisoned fortress is automatically captured as soon as an enemy unit (whether combat or non-combat) passes through it, leader units are — in this particular instance, at least — the equal of any infantry or cavalry unit. Moreover, leaders are especially well-suited for this type of “behind the lines” raid because they are not only immune to all adverse supply effects, but they are also the fastest units on the map. Thus, if an opportunity to pass through or around the enemy’s front should present itself — almost a certainty at some point in an 1812 game — then these fast-moving units (Generals Oudinot and Sacken, by the way, were born for this role) can, using forced-marches if necessary, race straight for the ungarrisoned Victory Point hexes in the enemy’s rear. Once loose behind the opposing army’s lines, these elusive raiders can roam across the map almost at will: passing through unoccupied, enemy-controlled fortresses and racking up Victory Points as they go. This tactic can occasionally be of use to the French in the early game turns, but it is much more likely to benefit the Russians in the middle and end game when the cumulative effects of attrition have ravaged the French army, particularly its cavalry arm. And since, in the later stages of the campaign, depleted areas will almost always blanket much of the map, these nimble, difficult to destroy units can avoid most serious risks by sticking mainly to 100% depleted areas that are also out of the support range of enemy supply trains or depots. In most cases, because of the lethal effects on regular combat units of being unsupplied, the opposing commander’s response to an enemy “nuisance raid” will be to send leader units of his own into his now vulnerable rear areas with the mission of reclaiming as many unoccupied fortress hexes as possible, once the rampaging enemy leader and his retinue have moved on. CONCLUSION“He that makes war without many mistakes has not made war very long.” 1812 was first published almost forty years ago. In spite of that, and in spite of the fact that a number of new titles dealing with Napoleon’s campaign against Russia have seen print since the SPI game first appeared, it is still my favorite treatment of the disastrous campaign that ultimately led to the end both of Napoleon’s reign and of his empire. Because the Napoleonic Wars are of particular interest to me, I have examined most of these newer titles, and played quite a few of them. Some of them I liked, and some I didn’t; but the fact remains that whenever I get the urge to revisit Napoleon’s invasion of Russia, it is almost always 1812 that I take down from the shelf. The reason I return to this title again and again is simple: the grand-tactical version of 1812 — putting aside its heavily abstracted game system and unimpressive graphics — offers a manageable and, I would argue, historically illuminating simulation of one of the most decisive military campaigns in history. The mechanics of play may appear somewhat cumbersome and artificial, but their aggregate effect is to convey a real sense of the very different strategic challenges that faced both Napoleon and Tsar Alexander in the summer, fall, and winter of 1812. In my view, this is the main reason that John Young’s treatment of Napoleon’s failed invasion of Russia really works, both as a game and, even more importantly, as a historical simulation. And if this contention seems a bit overgenerous, perhaps a little personal history will help to flesh out my argument.
Still, I was uneasy with the seeming superficiality of the established and Franco-centric view (Napoleon got all the blame and Alexander none of the credit) of France’s failure in Russia, and this discomfort, more than anything else, probably accounted for my interest in seeing how grand-tactical 1812 would actually work as an abstract model of the historical campaign; stated differently, I was keenly interested in seeing if John Young’s game design had any real simulation value, over and above a few well-known names on some game counters, and a vaguely recognizable map that covered much of Central Europe and northern Russia. In this, I was pleasantly surprised. After playing through the grand-tactical 1812 campaign game a few times, I was quite taken aback (in a good sort of way) to find that — in spite of my own 20/20 historical hindsight — I nonetheless managed, in the course of my first few games as the French, to repeat many of the same strategic miscalculations that Napoleon had ostensibly made during his own campaign against the Tsar. Which is to say: because I was convinced that a decisive French victory depended on my delivering a quick knockout blow to the Tsar’s army before either the weather, the steady influx of Russian reinforcements, or political unrest elsewhere in the Empire could affect events on the battlefield, I force-marched my army deep into the vast Russian interior in a relentless pursuit of the constantly-retreating enemy. Unfortunately, I quickly discovered that while my rapid marches invariably gobbled up a lot of terrain, I was also consistently burning out a sizeable part of the Grande Armée in the process. The end result of these early all-out French offensives was that my advance usually petered out somewhere around Smolensk, Kaluga, or Vyazma; and that once my eastward progress stalled, the attrition table and raiding Russian leader units tended to do the rest.
In the end, of course, games like 1812 are only abstract representations of the designer’s view of historical reality. As such they will always have flaws. This game, much as I personally like it, is no exception; thus, it is easy to find elements in 1812 that either make no sense or that even fly directly in the face of logic. The unique capabilities of the leaders in the game, and the arbitrary and often capricious effects of attrition on the opposing armies are just two examples. There certainly are more. Nonetheless, 1812 delivers in the one area that matters most: it conveys, at least in my opinion, a real sense of the strategic challenges (military and otherwise) that confronted both Napoleon and Tsar Alexander as the war ground on through the summer, fall, and winter of 1812. Moreover, it is a game of cunning and maneuver, and not of constant combat; a game in which sudden, unexpected moves can achieve great things; but also a game in which bold strokes can, because of failed marches, sputter out and come to naught. And, above all else, it is unpredictable. Certainly, this game is not for everyone. However, for those players with an interest either in Napoleon’s ill-fated invasion of Russia or in Napoleonic warfare, more generally, I cannot recommend it too highly. Author's PostscriptAlthough, for reasons unknown, I neglected to mention this fact in the above essay: SPI issued an interesting response to a written rules inquiry regarding both LEIPZIG and 1812. In answer to a mailed-in post-publication inquiry about the forced-march capabilities of mobile supply units in both LEIPZIG and grand-tactical 1812, the SPI rules editor formally declared that: in both LEIPZIG and 1812 (although this interpretation is not made clear in either the original rules or in the errata for these two titles) mobile supply units may attempt to TRIPLE force-march in both games.Recommended ReadingSee my blog post Book Reviews of these titles, which are strongly recommended for those readers interested in further historical background. Recommended ArtworkThis map of the Battle of Borodino makes a fine wall decoration for the game room with a Napoleonic theme.
Subscribe to:
Posts (Atom)
Subscribe To
 Posts
All Comments
Posts
All Comments
Popular Posts
About Me
My Nephew Joe and Three Marine Buddies
|


