|
Showing posts with label description. Show all posts
Showing posts with label description. Show all posts
SPI, THE NEXT WAR (1978)
THE NEXT WAR is a hypothetical simulation of a Warsaw Pact offensive against NATO forces in Europe in the late 1970’s. THE NEXT WAR was designed by James F. Dunnigan and published by Simulations Publications, Incorporated (SPI) in 1978. THE NEXT WAR is packaged in the large soap box format that SPI reserved, during this period, for its "super-sized" monster games.
HISTORICAL BACKGROUND
Almost from the day that the Nazi High Command formally surrendered to the victorious Allies in 1945, a now politically-partitioned Germany took on a dangerous new role as a key flash point for Cold War tensions between the Eastern Bloc, dominated by the Soviet Union, and the Western Allies, under the leadership of the United States. Inevitably, given their conflicting post-war political goals — particularly as they pertained to Eastern Europe and the Balkans — relations between the western democracies and the Soviet Union steadily deteriorated. Finally, on 24 June 1948, the Soviets blockaded Berlin by closing off all rail and road access to the city in an attempt to gain complete control of the divided former German Capital. The United States, Great Britain, and other members of the British Commonwealth responded with the Berlin Airlift. At its peak, the airlift was delivering over 13,000 tons of fuel and food to the beleaguered city every day. Clearly, the cooperation between East and West that had won the Second World War was at an end. However, one positive, if indirect outcome of the Berlin Airlift was the formation, on 4 April 1949, of the North Atlantic Treaty organization (NATO). Faced with an embarrassing political and military failure, the Soviets finally ended the blockade on 12 May 1949. However, they did not abandon their designs on achieving control of an economically resurgent West Germany.
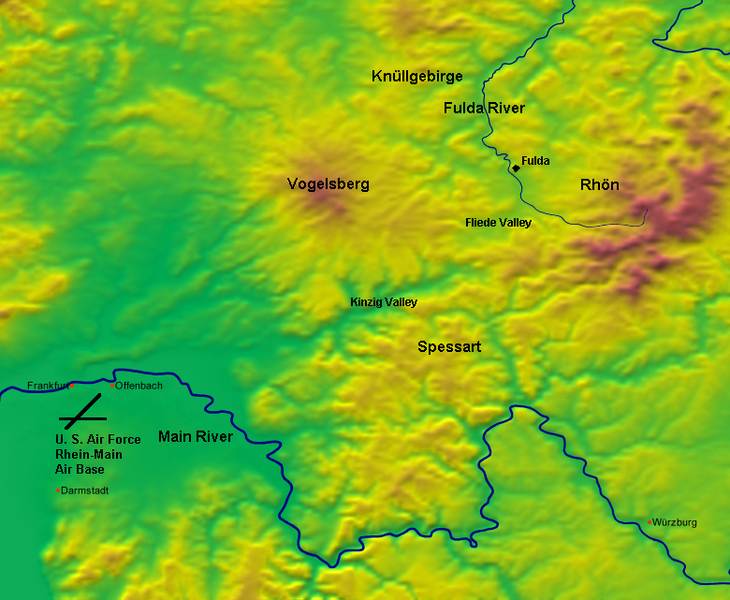
The Soviets, confronted with a strong and stable military alliance between Western Europe and the United States, reacted in kind; on 14 May 1955, the eight Communist Countries of the Eastern Bloc formed a military alliance of their own, known — because of the site chosen for the treaty’s formal signing — as the Warsaw Pact. Two great hostile military alliances now faced each other, one on each side of the “Iron Curtain.” Given the ongoing belligerence of the Communist leadership in the Kremlin; their ruthless suppression of the peoples of Eastern Europe, and their aggressive political adventurism in Africa and Latin America, the possibility of a Warsaw Pact invasion of Western Europe became, by the late 1950’s, a key feature of NATO planning as the Cold War continued. The two most likely routes for a Soviet mechanized offensive into West Germany were obvious: the North German Plain, and the Fulda Gap. The British Army of the Rhine (BAOR) was entrusted with covering the North German Plain; while the US Vth Corps was assigned the initial defense of the Fulda Gap. If the Soviets attacked without warning, these British and American formations would have to halt the Warsaw Pact offensive long enough for reinforcements from the other NATO countries to move up to the front. Permanently arrayed against these British and American trip-wire units were mechanized divisions from the Soviet, East German, and Polish Armies. The other Warsaw Pact countries, like the supporting NATO members, would be expected to send their own additional front line and reserve units into the battle area, once hostilities actually began.
DESCRIPTION One unusual design feature of THE NEXT WAR — at least for its time — is that combat is treated as a function of movement, and occurs in a series of engagements during the course of the movement phase, as individual units move into contact with the enemy. In the basic “fast game” versions of the design’s shorter scenarios, air and naval operations can be dispensed with completely. However, despite the game’s emphasis on the ground war, the air and naval campaigns have not been short-changed. The elaborate subroutines for air and naval combat operations are so richly detailed, that they both can almost stand alone as independent games outside of the larger integrated simulation. The Air Game involves allocating hundreds of units to specific airfields and sectors along the front. From these airbases, the air units of the two combatants conduct a variety of different air missions, such as (but not limited to): air supremacy, CAP, air-to air, air-to-ground, air-to-naval, ground support, and air reconnaissance. The Naval Game, on the other hand, focuses only on naval operations in the Baltic Sea and Denmark Straits, and offers, in terms of maneuver tempo and combat, a completely different gaming experience from that of the air or land games.   A PERSONAL OBSERVATION Among the many monster game players who, after giving Dunnigan's take on continent-wide modern warfare a try, decided that they didn't like his game design, three criticisms tended to recur with surprising consistency: first, they pointed out that the ground combat CRT was both asymmetrical and counter intuitive (it sometimes made sense, for example, to attack at lower rather than at higher odds); second, the rules integrating air-ground operations were cumbersome, while those for naval operations were downright unworkable; and third, whatever its other virtues, the basic architecture of the game — once the fighting actually started in earnest — quickly tended to be swamped by a "tidal wave" of different (and confusing) die-roll modifiers.  One interesting idea to emerge — at least in some gaming circles — during the years that followed the initial release of THE NEXT WAR, was for (truly ambitious) players to graft key elements from the rules package of Mark Herman's excellent, if highly derivative, GULF STRIKE (1983, 1988, and 1990) onto the basic platform of the older Dunnigan design. Because of the obvious connection between the two games, I thought at the time that this might well be a workable idea; however, for my own part, such a project seemed then (and still does, three decades later) like it would probably be more trouble than it would actually be worth. Visually, THE NEXT WAR, when it is laid out and set up for play, is an awesome game to behold. The maps are — thanks to the indefatigable Redmond Simonsen — both chock full of information and yet still attractive to the eye. The game charts and tables are easy-to-use, if a bit utilitarian. And the two thousand plus counters, although back-printed in the typical SPI matte-finish style, are both readable and colorful enough to be interesting. The rule book, at over thirty pages of relatively small print, is admittedly a slog the first couple of times through; nonetheless, it is generally well-organized, and, with a bit of practice, players can usually find a "sought after" rules case comparatively quickly. One particularly nice feature of the game package is the extensive Order of Battle information for both NATO and the Warsaw Pact forces that has been included. In the opinion of at least one of my gaming friends back when the game first appeared, the research incorporated into the OoB work, alone, was worth the price of the game. Visual appeal and size, of course, will only take a design so far when it comes to its value, both as a game and as a simulation. The graphic presentation, and the sheer scale of the game, however, are not the only elements that — to my mind, at least — make this title a "winner". In addition, the texture and historical richness of the overall game system also make this ground-breaking design a worthwhile title for any player interested in modern (post-World War II) combat operations. The optional rules included with THE NEXT WAR are so numerous and detailed that it would take an additional page, just to catalog them. Suffice to say that if SPI could glean, from unclassified sources, the characteristics of a new weapons system, operational doctrine, or special combat capability, then those militarily-relevant factors probably found their way into the rules for THE NEXT WAR. It goes without saying that, for many gamers, all this information and the operational detail that it inevitably adds to the design's basic rules architecture means that actually mastering the game system — with its many phases and subroutines — is a bit of a chore. But, I submit that, for those who are genuinely interested in modern military affairs, it is a chore that is well worth undertaking. THE NEXT WAR may not be the perfect simulation of large-scale conventional (and possibly tactical nuclear) European warfare in the late 20th century, but — in my view, at least — it still does a surprisingly good job of "delivering the goods", both as a simulation and as a game. And considering that this SPI monster was first published thirty-four years ago, that is pretty impressive, in and of itself. Clearly, given the sheer volume of simulation detail that it contains and its complexity, this Dunnigan opus is most definitely not a game for the novice or, for that matter, even for the casual player. However, I can think of no better, more comprehensive simulation of large-scale, 1970’s combat operations in Europe than THE NEXT WAR. For this reason, if for no other, (and it should be noted that it is actually a "blast" to play) I consider it to be a must own for those gamers with a serious interest in recent contemporary history, or for those with an abiding curiosity about what a conflict between the Warsaw Pact and NATO might have looked like, had it actually occurred. Design Characteristics:
Game Components:
GDW, THE BATTLE OF LOBOSITZ (1978)
THE BATTLE OF LOBOSITZ is a grand-tactical simulation of the clash between a force of over twenty-four thousand Prussians, under Frederick the Great, and a larger Austrian army, led by Marshal von Browne, near the Saxon town of Lobositz in October of 1756. The game was designed by Frank Chadwick and published by Game Designers’ Workshop (GDW) in 1978. LOBOSITZ is one of a whole batch of different titles that, taken together, make up GDW’s Series 120 collection of small, folio-style introductory games. These Series 120 titles were described by GDW as “gateway” games because they were intended to be easy to learn, used 120 or fewer counters, and could typically be played to completion in two hours (120 minutes) or less.
HISTORICAL BACKGROUND
The two belligerents stumbled into each other near Lobositz, a town on the banks of the Elbe River, early on the morning of 1 October, 1756. At first, contact between the two forces was sporadic and relatively light. The Prussian army, which was approaching Lobositz from the west, initially received fire from its left (the area of the Lobosch Heights), and the limited nature of this action led Frederick to think that he had encountered a small Austrian rearguard. Visibility was poor — a thick morning fog made an accurate assessment of the enemy’s dispositions impossible — however, as the volume of fire increased and spread to his front, the Prussian monarch, who was still convinced that he faced an inferior force, ordered his cavalry forward to determine the strength and intentions of the enemy troops in his path. What Frederick’s horsemen discovered was an unpleasant surprise to the Prussian king: a large Austrian field army, instead of a small blocking force, was deployed in a defensive north-south arc across the Prussian army’s entire front. This arc stretched from the Lobosch heights in the north, passed in front of the town of Lobositz, and then continued south to the marshes near the hamlet of Sullowitz on Frederick’s right. The Austrian defensive position, although not perfect — von Browne’s line south of Lobositz was bisected by a shallow stream, the Morellenbach — was still strongly situated with the Elbe River and Lobositz anchoring the Austrian right while Sullowitz and a combination of marshland and forest covered von Browne’s left.
Not surprisingly, given his initial misappraisal of the situation before him, the battle did not begin particularly well for Frederick. The fog hampered most of the Prussian king’s initial offensive moves against the Austrians, and also limited the effectiveness of his artillery. As the morning mist gradually cleared, however, the Prussians slowly began to gain the upper hand in the fighting around Lobositz. Finally, after being repeatedly repulsed, the Prussian infantry was at last able to storm the town at bayonet point: a success that forced the Austrian center to fall back. The Battle of Lobositz lasted most of the day, but finally ended when von Browne, having lost ground on his right and center, decided to withdraw his army from the field; which he did in good order. Lobositz was far from Frederick’s finest battle. In fact, early in the day, after having lost heavily from among his best cavalry formations, the Prussian king actually thought that the action might be lost and considered abandoning the field to von Browne’s forces. Fortunately for Frederick, the discipline and élan of the magnificent Prussian infantry retrieved the situation before he could make any additional mistakes. Both sides lost about 3,000 men, but von Browne’s withdrawal left the Saxon garrison at Pirna with no option but to surrender, and (as was typical of the times) transfer their allegiance and service to Frederick and Prussia. DESCRIPTIONTHE BATTLE OF LOBOSITZ is a grand tactical (regiment/brigade/wing) simulation of the battle between 24-29,000 Prussians, led by Frederick the Great, and an Austrian army of 34,000, under Marshal Maximilian von Browne, which took place on the banks of the Elbe River in and around the Saxon town of Lobositz on 1 October, 1756. LOBOSITZ is played in “Igo-Ugo” game turns, and each game turn represents 30 minutes of real time. An individual game turn is composed of a Prussian followed by an Austrian player turn and sticks to a set sequence of player actions: the Movement phase (the active player moves any or all of his eligible units); the Rally phase (the active player rolls to rally any of his demoralized units); the Offensive Fire phase (the acting player fires any units that did not move during this turn’s movement phase); the Defensive Fire phase (the non-phasing player conducts fire attacks against any enemy units within range); and the Mêlée phase (the phasing player conducts adjacent mêlée attacks in those cases in which both the attacker and defender have passed their pre-mêlée “morale checks”. The game is 16 turns (eight hours in real time) long. Combat in LOBOSITZ, as already alluded to, can take one of two forms: fire combat and mêlée combat. Each type follows its own unique combat resolution procedures, and each has its own influence on the flow and “feel” of the game.  
When it comes to winning or losing THE BATTLE OF LOBOSITZ — as was the case historically — the burden of attack is squarely on the Prussian player; the Austrian commander only has to deny Frederick a significant battlefield success, not win one of his own. The good news for the Prussian player, such as it is, is that there are actually several different ways for Frederick to win the game. If the Prussian army manages, for instance, to sweep the map completely clear of Austrian units — something, by the way, that I have never seen — then the Prussians gain a (richly-deserved) decisive victory. More attainable, but still quite challenging for the Prussian player — in my view, at least — is the modest tactical victory that Frederick actually obtained in the real battle. Unfortunately, to accomplish even this limited success, the Prussians must capture, from the Austrians defending them, both the Lobosch Heights and every one of the hexes (eleven in all) that make up the town of Lobositz. And they must do all this in the face of a powerful enemy force, a blinding morning fog, and a limited number of game turns. A PERSONAL OBSERVATIONLOBOSITZ is one of two Series 120 games, designed by Frank Chadwick, which cover battles from the Seven Years’ War. The other half of the pair, THE BATTLE OF PRAGUE, simulates a much smaller action between the Prussians and Austrians that occurred on 6 May 1757 near the city of the title. Both games use the same relatively simple, grand-tactical game platform. In terms of play-balance, LOBOSITZ tends to lean towards the Austrians, while PRAGUE — unless I’m missing something important — heavily favors the Prussians. These games, it should be noted, are not Chadwick’s first attempts to simulate the special nature of 18th century warfare during the age of Frederick the Great: his larger and much more detailed TORGAU had already appeared a full four years earlier, in 1974. And although the two battles depicted in these later, smaller games are both modestly interesting from a historical standpoint, an obvious question, nevertheless, presents itself: Why did GDW choose to feature these two relatively obscure engagements and not a pair of more famous battles such as Rossbach and/or Leuthen?One possible answer, of course, is that — at the time he began work on these two Series 120 games — Frank Chadwick actually had plans to design larger, more detailed TORGAU-style simulations of some of Frederick’s other, better-known battles at some later date. Such a possibility is certainly plausible; after all, the Battle of Leuthen, as Paul Dangel proved with his superb Clash of Arms game design, LEUTHEN: FREDERICK’S GREATEST VICTORY (1997), turned out to be, in the hands of the right person, an excellent wargame just waiting to be developed. For my own part, however, I have a sneaky suspicion that the designer’s decision to simulate this particular set of actions (LOBOSITZ and PRAGUE) was probably dictated more by the special requirements of the Series 120 design format than by any other factors. Still and all, whatever Chadwick’s original plans may have been for simulating some of the other battles of Frederick IIndof Prussia using this clever, but relatively simple game platform: three decades later, we are still left with only PRAGUE and LOBOSITZ to consider; so I think that it is probably safe to assume that Frank has moved on to other things. Since we, on the other hand, are at least temporarily focused on this early Chadwick design, I will attempt to move things along by raising an obvious, if rhetorical question: How does THE BATTLE OF LOBOSITZ look now, after having bumped around in relative obscurity for over thirty years? My short answer is that — all things considered — it really doesn’t look all that bad. Admittedly, the graphics for LOBOSITZ — as was typical of virtually all GDW games during this era — are neither especially evocative of the battle’s historical period (see AGINCOURT for a particularly egregious example of this) or even all that interesting to the eye, the “ugly duckling” appearance of this title conceals a surprisingly nicely-done “swan” of a grand-tactical game engine. That being said, LOBOSITZ is not, despite its Series 120 pedigree, really a “gateway” wargame in the same sense, for example, that SPI’s many NAPOLEON AT WATERLOO-based titles are. To be fair, the game is not especially difficult to learn if the prospective player understands at least something about conflict simulations. Nonetheless, I personally do not believe that any wargame which incorporates a multi-stage combat subroutine, elevation differences, “line-of-sight” rules, morale, and step-reduction should ever really be described — by me or anyone else — as an “introductory” game. That being said, and in spite of its somewhat denser than expected design architecture, I do think that LOBOSITZ would be readily accessible to almost any player with even a modest amount of gaming experience. Thus, while I would never recommend this particular title — or most of its Series 120 cousins, for that matter — as an “introductory” game suitable for an absolute novice, I do think that it is an excellent choice for more seasoned gamers of almost any stripe. Particularly if those players are interested in the campaigns of Frederick the Great, but don’t want to spend an entire day refighting one of his battles: which, based on my own previous experiences, is always a distinct possibility when it comes to tackling more sophisticated games like COAG’s LEUTHEN, or GDW’s TORGAU. Design Characteristics:
Game Components:
Related ReadingTHE ‘ALSO RANS’: S&T INSERT GAMES THAT FAILED TO MAKE IT ONTO MY ‘TOP 20’ FAVORITES LIST, PART VS&T Issues #’s 69, 71, 72, 73 & 75INTRODUCTIONThe following list represents the fifth installment in my ongoing series of relatively short (for me, at least) descriptions of S&T magazine games published during what is sometimes referred to as the “Golden Age” of SPI: the 1970s and 80s. These are S&T insert games that did not make it — sometimes for painfully obvious reasons — onto my “TOP 20 FAVORITES LIST”. Some of the early S&T titles featured in this post were well-received when they first appeared, either as simulations or as games, some were not. In one case, that of Sterling S. Hart’s ARMADA, the game, as originally published, proved to be utterly unplayable; hence, in order to quiet the complaints of disgruntled customers, SPI was obliged to extensively rework and then issue a major rewrite of the game’s rules. In another instance, that of NAPOLEON’S ART OF WAR, the ruling “Junta” at SPI — perhaps in an attempt to atone for the ARMADA debacle — broke with its usual custom of publishing one simulation per magazine and included two completely different Napoleonic battle games, each the work of a different designer, in the same issue: Omar DeWitt’s EYLAU and Bob Jervis’ DRESDEN. One unexpected characteristic of this latest collection of S&T games is that, although it includes the work of several well-known designers — David Isby and John Prados among them — there is not a single game in this particular batch of titles from the usually prolific James F. Dunnigan. That being said, all of the games in this collection, whether deservedly or not, have more or less faded into obscurity. Still, whether widely popular, moderately well thought of, or even generally reviled, I believe that all of these games are interesting at least from one standpoint: their place, however fleeting, in the history of game design and development. I hope that you, my fellow players and readers, agree with me.FIVE MORE S&T PROFILES21. Strategy & Tactics (S&T) #69, TANNENBERG,included a game of the same name and, like the other magazines in this series of posts, S&T #69 (July/August 1978) dates back to the “Golden Age” of SPI. This particular issue featured the following articles:
 TANNENBERG, or as a friend of mine once called it, “PANZERGRUPPE HOFFMAN”, is a very conventional design with a few unconventional “wrinkles” which, considering that this is a World War I game, allow for a surprising amount of fluid, mobile action. The game is played in game turns which represent three days of real time. Individual game turns are divided into a Russian followed by a German player turn; however in certain scenarios, the German player will move first, as the Russians are assumed to have already acted in the initial game turn. A four-color, hexagonal grid game map depicts the region in East Prussia (now part of Poland) where the main events of the battle occurred. The back-printed unit counters represent the historical combat units (brigades, divisions, and corps) that took part, or that could have participated in the actual campaign. The basic mechanics of TANNENBERG, as is the case with the other titles in the GREAT WAR IN THE EAST series, are simple “Igo-Ugo” with each player moving and then attacking in turn. Movement is restricted to two types: regular ground movement and rail movement. The supply rules — although important from the standpoint of movement, combat, and attrition — are neither complicated nor particularly onerous. The real essence of the game system comes from the command and control (headquarters) and Tactical Competence Rating (TCR) rules. To move or attack normally, a unit must not only be in supply, it must also be within range of a friendly headquarters unit. Each headquarters unit — very much like Russian leaders in PANZERGRUPPE GUDERIAN — has both a command “span” (the range in hexes over which orders may be broadcast) and a command “capacity” (the number of unit stacking points that may be controlled in each game turn). Interestingly, while command from a headquarters, depending on the TCR value of a unit, might not always be necessary for movement, it is absolutely required for a unit to attack. The TCR rules are, in some ways, a natural compliment to the headquarters rules. Each unit in TANNENBERG has a TCR value of from 1 (the best) to 4 (the worst). These ratings are important because, not only do they affect a unit’s movement initiative, they also affect both its ability to traverse difficult terrain and its ability to retreat into or through enemy zones of control (more on this retreat effect, later). Returning to the issue of movement initiative, units that, for one reason or another, do not receive movement orders from a friendly headquarters, or cavalry units that are being attacked by enemy units may still be activated via a successful die roll. In these situations, if the die roll is greater than a combat unit’s TCR value, then the unit may move normally, or, in the case of “screening” cavalry, may withdraw before combat. At its core, the combat system for TANNENBERG, like the rules for headquarters, is very reminiscent of PGG. Combat between adjacent enemy units is always voluntary; however, as noted earlier, a phasing unit MUST receive “orders” from a friendly headquarters to be able to attack. The game uses a PGG-style split-result, odds-differential combat results table (CRT), with combat results displayed as numerical values. In the case of the defender, losses may be taken either as steps, as retreat hexes, or as some combination of both. However — this being a game about World War I — the attacker may never retreat, but, instead, must always extract any required combat losses from his assaulting forces as casualties. Needless-to-say, with this type of combat system, it is very difficult for the attacker to inflict battlefield casualties on any defender who can retreat as a result of combat. This all changes, however, if the defender can be surrounded prior to combat resolution, is not adjacent to any friendly-occupied flight hexes, AND has a TCR value of 2 or more. The defender’s TCR value is important in this instance because units with a TCR of 1 (think: Germans) may retreat through enemy ZOCs without penalty, while all other units (think: Russians) are subject to elimination. Although TANNENBERG, viewed as a whole, works pretty well both as a simulation and as a game, two aspects of the game’s design are, at least in my opinion, somewhat disappointing. The first of these has to do with the graphic layout of the game charts and tables; the second has to do with the special Russian “idiocy” rules included as part of the Historical Campaign Game. In the case of the game map, the playing area is actually nicely done, being both reasonably attractive to the eye and unambiguous; the problem is with the swarm of different game charts and tables that clutter a large part of the map sheet’s borders. Because these various charts and tables, depending on where they are positioned, are oriented to face in different directions, they can be extremely difficult for one or the other player to quickly check during regular play. This may not be an issue for some gamers, but I found it distracting enough that I finally cut one chart section away from the rest of the map sheet (something I virtually never do!), just so I could reposition it for ease of use. My second criticism of TANNENBERG is a little more subjective. To help the Russian player march the 2nd army into disaster, the designer has included a set of special rules which severely constrain the actions of Generals Samsonov and Rennenkampf. From a simulation standpoint, David Isby’s decision in this regard makes a great deal of sense; from a purely gaming standpoint, on the other hand, it is a bit frustrating. Personally, I usually find “idiocy” rules — whether in FRANCE ’40, TURNING POINT: THE BATTLE OF STALINGRAD, DRIVE ON STALINGRAD, or the DESTRUCTION OF ARMY GROUP CENTER — off-putting at best, and downright irksome, at worst. That being said, there are also certain games that, because of the peculiar circumstances that they model, just don’t work that well without the addition of a few rules of this kind; for example, ANTIETAM and BORODINO both turn into very different (and historically incomprehensible) simulations of their respective battles if the limitations imposed by the designer are discarded. TANNENBERG tends to fall somewhere in the middle; thus, while I personally disapprove of Isby’s reliance on “idiocy” rules in this case, their inclusion is not really detrimental enough to seriously damage the game. Besides, if the players choose to, they can always chuck the whole lot of “special” rules, and leave the Russian player free to make his own mistakes. To provide players with a bit of replay value, TANNENBERG offers a Historical Campaign Game and, for those players who prefer to experiment, a Free Set-up Campaign Game which, interestingly enough, can be played by either two or three players (in the three-player game, by the way, the two Russian commanders may not coordinate their planning or even talk to each other during play). Moreover, for those who do not want to battle through the entire campaign, the game includes two shorter “snapshot” scenarios of different critical stages in the larger battle: The Battle of Tannenberg and the Second Masurian Lakes. In addition to the various scenarios, the game also offers a German “Hidden Units” option (in my opinion, a MUST when playing the Free Deployment Scenario) that makes the game even more exciting (or nerve-racking, if one is playing the Russians). Victory, in TANNENBERG, is determined on the basis of victory points which are accrued through the control of geographical objectives and by the elimination of enemy combat strength. Given the historical outcome of the battle, General Samsonov can expect to have a very tough time of it in the Historical Campaign Game, and, although Russian prospects are — depending on whether the two-player or three-player version is chosen — somewhat improved in the Free-Deployment Game, the baked-in German TCR advantage, in concert with the Hun’s “Hidden Unit” option, can go a long way towards neutralizing the Russian numerical advantage. A complete copy of TANNENBERG includes the following game components:
22. Strategy & Tactics (S&T) #71 CASSINO,included a game of the same name. This issue of S&T dates back to the “Golden Years” of Simulations Publications, Incorporated (SPI). This was the period when James Dunnigan and Redmond Simonson were still running things at the most prolific game publisher of its day. Content-wise, this copy of S&T #71 (Nov/Dec 1978) featured the following articles:
 The strangely unappealing, four-color hexagonal-grid CASSINO game map is a topographical representation — with varying elevations displayed in 50 meter increments using different map colors ala WELLINGTON’S VICTORY (1976) — of the terrain in and around the town of Cassino over which most of the historical action was fought. Each map hex is fifty meters from side to side. [Maybe I’m missing something, but there seem to be a number of very odd features depicted on Simonsen’s game map: several of the roads seem to be wrong; the buildings are both too generic (SNIPER! Anyone?) and scaled too large; and weirdest of all, the “north” marked on the map looks to be a full 90 degrees off — in reality, the due north shown by the map compass star is actually “northwest”!] The unit counters in the game are mainly companies and platoons, and represent the infantry, armor, engineer, and headquarters units that actually took part in the historical battle. Artillery and, in the case of the Allies, air power are represented in the game as abstract bombardment points. A single game turn is composed of two symmetrical (and interactive) player turns, and each player turn follows a set sequence of three basic action phases: the Preparation Fire Phase; the Movement Phase; and the Combat Phase. A single game turn is equal to six hours of real time, and each twenty-four hour period is composed of two day and two night game turns. Combat in CASSINO falls into one of three categories: Opportunity (regular fire); Bombardment (artillery, air, or mortar); and Close Assault combat. Attacks, depending on their type, can generate enemy “Pins”, step-losses, retreats, and/or alterations to terrain (the creation of ruins). As might be expected, in a tactical simulation like CASSINO, the nature of ranged fire — which can be either regular (small arms/tank) fire or mortar/artillery/air bombardment — makes both target observation and “line of sight” determination critical features in the game’s design. Oddly, however, in Prados’ view of this engagement, distance and elevation have little effect on fire effectiveness except at very short ranges. Fire attacks are resolved, depending on the type of mission being conducted, on one of two combat results tables (CRTs): the “Opportunity” fire table, or the “Bombardment” table. Opportunity fire — which, it should be noted, can be performed by both the phasing and non-phasing players — is usually conducted to “Pin” enemy units (this temporarily affects a phasing unit’s movement and also halves its combat strength). Not surprisingly, bombardment attacks are resolved during the prep-fire phase and have the potential to cause more enemy losses, but also carry with them the possibility of creating ruins (which increase the defensive value of the affected hex) or of inflicting “collateral damage" to units (friendly or enemy) in adjacent hexes. To win the game, the Allied player must capture the Continental Hotel in Cassino without losing 72 or more steps (a virtual impossibility against a tenacious and skilled German player); alternatively, he can win a decisive victory if he can capture both the Continental Hotel and the Abbey on the mountaintop high above. When it comes to the fighting in the town, the Allies, because of their shorter supply lines, armored combat power, and big advantages in artillery/air bombardment points have the edge. When the battle moves up the mountain towards the Abbey however, the situations of the two sides are largely reversed: the Germans then have the shorter supply line; they also have excellent defensive advantages because of the higher elevation and because of the multiplier effect of the ruins of the Abbey, itself. In both cases, the key to capturing the enemy-occupied ground necessary for an Allied victory lies with successful “Close Assault” attacks. Unlike some tactical games, combat units in CASSINO have ZOCs and combat between adjacent enemy units is mandatory. This means that every assaulting unit must attack somebody, and every defending unit adjacent to an attacker must be attacked. It also means that surrounds can be devastating to the defender, so the two sides (but especially, the Germans) must maintain a cohesive line when it comes time for the enemy player to move. This can be a bit tricky for the Germans defending in and around the Continental Hotel because a successful Allied bombardment attack against a weak unit during the prep-fire phase could blow open a hole through which a swarm of Allied units can then pour during their movement phase. To add to the German’s headaches, the Allied player’s Gurkhas have the unique ability to slip rather handily through enemy ZOCs and get behind the German line during any night turn that a gap in the Axis defenses makes such a move possible. THE BATTLE FOR CASSINO, because of its subject matter and scale, represents relatively new ground for John Prados. In spite of this fact, however, the overall design comes across as both tired and derivative. To be fair, Redmond Simonsen probably bears some of the blame for the mistakes on the game map, but the final responsibility for the map’s inaccuracies must still rest with the game’s designer. Putting aside the issue of the game’s graphics, there just doesn’t seem to be much about CASSINO that is, from a design perspective, particularly interesting. Step-reduction and headquarters-based logistics, even in 1978, were certainly not new. And the use of bombardment “Pins” is straight out of the designer’s own YEAR OF THE RAT (1972), while the “Reserve” rule made its first appearance in another early Prados game, VON MANSTEIN, in 1975. Even the combat system, although workable enough, shows very little real imagination. The rules governing “close combat” in the obscure and largely unloved OMAHA BEACH (1974), for example, are more innovative than those of CASSINO; which, when everything is said and done, are almost identical to the combat routines of the old Avalon Hill classics, soak-offs and all. In the final analysis, I suppose that my main beef with Prados’ treatment of the “Third Battle of Cassino” is that it delivers far less that it promises. On first inspection, CASSINO seems to be a bit like a cross between SPI’s PANZER ARMEE AFRIKA (1973) and GDW’s AVALANCHE (1976). For example, like PAA, the combat units in CASSINO all have huge movement allowances (they can, for the most part, dash all over the map in a single player turn), and the (rechargeable) supply-bearing headquarters units behave very much like mega-versions of the supply counters in PANZER ARMEE AFRIKA. In addition, the similarity in the time scale of the CASSINO and AVALANCHE game turns (6 hours and 8 hours, respectively), the reliance on company and platoon-sized units, as well as some features of the game platform are all suggestive of Chadwick’s larger game, although the difference in hex sizes — 50 meters versus 1,300 meters — means that the tactical feel of the two games is utterly different. Unfortunately, a single play-through of Prados’ game quickly shows that the apparent similarities between THE BATTLE FOR CASSINO and the two older titles are largely limited to looks. Moreover, like many of this designer’s other creations, this game has an oddly “unfinished” feel to it; hence, in terms of the way these three games play, they are as different as night and day: PANZER ARMEE AFRIKA and AVALANCHE are actually both historically informative and fun; CASSINO, on the other hand, is — at least for me — a tedious slog with little, if any, real simulation or replay value. There is undoubtedly an exciting and historically persuasive simulation of this battle waiting to be designed; regrettably, this isn’t it. In the meantime, my recommendation for those players who would like to try a more interesting and enjoyable treatment of the “Third Battle of Cassino” is to look either at Michael Bennighof's CASSINO '44 (2009) or at Courtney Allen’s “area-impulse” design, THUNDER AT CASSINO (1987). CASSINO '44 — based on the PANZER GRENADIER Game Sysytem — is a highly detailed, platoon-level treatment of all four battles for Monte Cassino. Allen’s game is less complicated and less textured than CASSINO '44, but both of these later games are a lot better than THE BATTLE FOR CASSINO! A complete game of CASSINO is seventeen turns long. The game offers only the historical Standard Game; there are no additional scenarios, nor are there any optional rules. CASSINO includes the following components:
23. Strategy &Tactics (S&T) #72, ARMADA,which also included a copy of the game of the same name. This copy of S&T #72 (Jan/Feb 1979) dates from the Dunnigan/Simonsen era at SPI and contains the following featured articles:
 Based on the preceding description, the generation-long competition between Protestant England and Catholic Spain for European supremacy would seem to be a perfect subject for a sweeping, grand-strategy game that encompassed the diplomatic, economic, religious, and military conflicts of an exciting and extraordinarily important period in history. Unfortunately, ARMADA, at least as originally published, is not that game. What it is, instead, is a pastiche of design ideas — some very good, some very bad — that when combined, form a design that is muddled, confusing, and hopelessly unplayable. This is unfortunate, both because the game’s designer, Sterling S. Hart, is no slouch when it comes to creating innovative game systems — it was he, after all, who designed KURSK ’71 — but also because the underlying architecture of the ARMADA game system is really quite clever. Apparently the powers at SPI felt the same way; hence, their response was swift: the game’s original developer, Brad Hessel, was dumped from the project; and, in his place, Greg Costikyan and Eric Goldberg, along with a humbled but still determined Stanley Hart, all threw themselves into the daunting task of fixing the deeply-flawed game. The product of this intensive new effort was a completely reformulated set of Second Edition Rules. [For those players who are interested, both the 2nd Edition Rules and an unofficial, but (I am told) excellent 3rd Edition of the game rules are available at Grognard.Com. See the link in the sidebar.] Given the problems associated with the original version of the game, the comments that follow, not surprisingly, refer exclusively to the revamped Second Edition of the game. ARMADA (2nd Ed.) is played in game turns: summer turns are one month long; winter game turns (November – March) represent five months of real time. A single game turn is divided into four interactive phases (each of which contains multiple player segments) during which all game operations are conducted. These are: the Joint Activation Phase; the Naval Phase; the Land Phase; and the Joint Administrative Phase. The four-color, hexagonal-grid game map represents both that part of the Atlantic that borders England, Spain, France, and the Low Countries, as well as the Mediterranean coasts of Spain and France. One player represents Philip II of Spain, and the other assumes the role of Elizabeth I of England. The goal of both England and Spain is to conquer enemy territory, attain victory for their side in the French Civil War (Catholics vs. Huguenots), and eliminate enemy naval units. To accomplish this, the two players compete with each other using leaders, land and naval combat units, and, of course, money. Wars are expensive, and both sides must shrewdly allocate the funds in their respective treasuries if they are to build and maintain the military units necessary to pursue their strategic objectives. ARMADA offers only the Historical situation as a starting point. No alternative scenarios or optional rules are included with the second edition of the game. Nonetheless, a great deal of variation is built into the basic situation because of the different strategic options available to both players. Spain, for instance, may concentrate her resources on land combat in France and/or Holland, or invade England in 1587 rather than 1588. England can choose to strongly support the Protestant Huguenots in France, or, alternatively, to invade Spain’s northern ports and destroy the valuable Spanish ships that, inevitably, will be based there. Between two experienced and inventive players, no two games of ARMADA need ever be the same. Please note that this game — putting aside the already alluded to rules issues — is above average in complexity and will require considerable study before players become familiar with its unusual game mechanics. Somewhat perplexingly, although spaces for only 16 game turns appear on the turn record track, ARMADA (2nd Edition) is actually 17 turns long. A complete game of ARMADA includes the following components:
24. Strategy & Tactics (S&T) #73, PANZER BATTLES: Tactical Armored Warfare in World War II,when it was originally mailed, included a copy of a game of the same name. S&T #66 (Mar/Apr 1979) contains, along with its insert game, the following articles:
 S&T #73 Magazine Game: PANZER BATTLES: Tactical Armored Warfare in World War II, designed by Thomas A. Walczyk and with graphics from Redmond A. Simonsen, is a set of tactical simulations of armored engagements covering different time periods, and in different operational settings, during World War II. S&T #73 Magazine Game: PANZER BATTLES: Tactical Armored Warfare in World War II, designed by Thomas A. Walczyk and with graphics from Redmond A. Simonsen, is a set of tactical simulations of armored engagements covering different time periods, and in different operational settings, during World War II. In the case of PANZER BATTLES: Tactical Armored Warfare in World War II, what players are greeted with when they first examine the game is a sort of “mini-me” World War II version of MECHWAR 2. This means that, while this magazine game is admittedly complex and somewhat challenging to learn, it does not swamp its players with detail like its much larger cousin. In this sense, PANZER BATTLES is — so far as I am concerned, at least — far more accessible (and playable) than either MECHWAR 2 or even Harold Hock’s TOBRUCH (1975). If nothing else, the game’s rules are considerably shorter and, more importantly, players have a lot fewer charts and tables (and hence, a lot fewer die rolls) to cope with in this game than in the others when it comes to turn-to-turn play. The large four-color, hexagonal-grid PANZER BATTLES game map is actually sectioned into three different smaller maps, one for each scenario (more on these later) included with the game. Each map hex is two hundred meters across. The combat units in the game are primarily tank platoons with a smattering of mechanized (American) infantry and a single German PAK 88 and its crew. The operational strength (in vehicles) of an individual platoon is indicated by a numbered chit placed beneath each unit counter; these chits, in turn, are exchanged as combat losses occur. Prior to play, the platoons of each side are assigned by their owning players to different companies (for purposes of command) and, occasionally, these companies are further organized into battalions (for morale purposes). These company assignments are significant not just because of the command rules, but also because a company’s component platoons are required to remain within one or two hexes (depending on the unit’s nationality) of another platoon from the same company. A game turn in PANZER BATTLES represents five minutes of real time and is divided into two separate, but interactive player turns. Each game turn follows a simple but rigid sequence of player actions: first, the phasing player conducts indirect fire attacks (off-board artillery), second, the non-phasing player writes orders for his coming player turn; third, the phasing player (based on his own pre-written orders) moves and/or conducts attacks; once all combat for this phase is resolved, the sequence is repeated and the two players exchange roles. At the end of the second player’s movement phase, the turn marker is advanced one space, and a new game turn begins. Needless-to-say, a lot more occurs in a single player turn than the preceding description might suggest, but probably the most important action that each player will perform is that of selecting orders for his own coming player turn. The requirement that players write brief orders for each of their companies, although it would seem to slow play, really does not. This is because there are only five different types of commands, and two of them — Rally and Withdraw — pertain to issues of unit morale and not to regular combat operations. For the most part, the non-phasing player will issue each of his companies only one of three orders: Bound (every platoon must move); Overwatch (no movement is allowed, but all platoons may conduct “Opportunity” or regular fire combat); and Bounding Overwatch (at least one platoon must move, but the other platoons in the company may either move or fire, at the owning player’s option). This simple game mechanism eliminates one of the most pernicious and unrealistic features of the comparably-scaled PANZERBLITZ Game System: the tendency of individual armored platoons to scatter across the PANZERBITZ game map in a flurry of independent, yet perfectly-coordinated missions. In addition, it also gives the game a distinctly “si-move” feel, but without all of the cumbersome record keeping that usually accompanies a typical “simultaneous movement” game system. In spite of the preceding catalog of its good points, PANZER BATTLES is not without its share of problems, as its abysmal 5.19 rating over at boardgamegeek.com clearly illustrates. And, of the game’s several problems, the most obvious, and probably the most off-putting is its somewhat convoluted combat routine. This multi-step process — which requires players to refer to several different charts and perform more than one die roll to determine results — appears, on its face, to be both complicated and cumbersome; and if compared to a game like PANZERBLITZ, it certainly is. However, a little practice with the PANZER BATTLES combat system will quickly show that, while it is not simple, it is, nonetheless, far easier to execute than the combat routines of either MECHWAR 2 or TOBRUCH. Unfortunately, combat is not the only one of the game’s woes. The other more serious problem with PANZER BATTLES is one that seems to crop up again and again in SPI tactical armored titles: the lack of lots of different scenarios. Because the designer has opted to focus on only three historical tank-versus-tank engagements, the game — besides largely ignoring the importance of “combined arms” doctrine on the World War II battlefield — offers very little in the way of replay value. Each of the situations is, at least, moderately interesting but, once they have been played through a few times, they tend to lose their appeal. This means that, in spite of its many good features, my own experience with the game shows that a lot of players tend to lose interest in PANZER BATTLES at about the same time that they finally master the game system; hence, I suspect that a fresh batch of scenarios (even though they would require additional, post-publication “DTP” counters and game maps) might, even at this late date, improve both this game’s overall popularity and its “staying power”. PANZER BATTLES, as already alluded to, offers players only three different scenarios. The first, Action Near Gazala — 26 May 1942 is a ten-turn simulation of the action between elements of the 15th Panzer Division and the British 4th Battalion, County of London Yeomanry, in North Africa. The second is Arracourt — 20 September 1944, which recreates the armored clash between an American armored battalion from Task Force Abrams, and a German combined arms force from Kampfgruppe Junghannis. Arracourt is twelve turns long. The third and final game situation is the Defense of the Berlin Highway — 22 March 1945, a twelve-turn scenario that covers a clash between three advancing battalions of Soviet T34/85 tanks, and a single German company equipped with PzKw V (Panther) tanks. PANZER BATTLES includes the following components:
25. Strategy &Tactics (S&T) #75, NAPOLEON’S ART OF WAR,like the other magazines in this series, was published during the “Golden Age” of SPI and was accompanied, interestingly enough, by not one, but two insert games: EYLAU and DRESDEN. A copy of S&T #75 (Jul/Aug 1979) contains the following articles:
 The basic game engine used in both of the games featured in NAPOLEON’S ART OF WAR, James Dunnigan’s NAW Game System, is one of the best-known in wargaming; for that reason, I will only briefly touch on it here. For starters, because this popular game system is grand-tactical in its focus, it is, with very few exceptions — Kevin Zucker’s NAPOLEON’S LAST BATTLES (1976) being one notable outlier — used by designers to simulate individual battles and only rarely, to model longer, more extended campaigns. All of the titles associated with the NAW Game System are played on hexagonal-grid maps and hex sizes will tend to vary in size, depending on the specific title, from between 400 and 800 meters. Each game turn follows a simple “Igo-Ugo” player sequence in which first one and then the other player moves and then resolves combat. And in most cases, game turns tend to equal between one and two hours of real time. Attacks may take one of two forms: direct (adjacent) attacks; and bombardment (from artillery units firing from two hexes distant). Zones of control are, with very few exceptions, both rigid and “sticky” and combat between adjacent units is mandatory. All phasing units adjacent to enemy units must attack, and all defending units must be attacked (either directly or by artillery bombardment). Combat is resolved using a simple odds-differential combat results table (CRT) and most results, except at higher odds, will take the form of Attacker or Defender Retreats rather than Eliminations. For this reason, successful tactical play in all NAW-based games depends on the proper timing, by both players, of retreats and advances in order to achieve surrounds against enemy units. Terrain types in these games tend to be relatively few, and will affect both movement and combat. Movement rates will usually be accelerated along roads, and terrain effects on combat, where applicable, will usually result in either a defensive multiplier or a reduction in the attackers’ strength. Along with this standard package of rules, NAW-based games will also often include special rules covering such diverse factors as weather, night operations, variable reinforcements, combined arms attacks, and demoralization. Interestingly, virtually all of the aforementioned special rules are present in one or both games in NAPOLEON’S ART OF WAR: EYLAU and DRESDEN. Omar DeWitt’s EYLAU is a simulation of the bloody, but inconclusive battle that was fought between the French army, under Napoleon, and a combined force of Russian and Prussian troops, led by Russian General Baron Levin Benningsen, near the small Polish hamlet of Eylau, on February 7th and 8th, 1807. That the battle was fought at all was the result of an uncharacteristically audacious plan on Benningsen’s part to march 90,000 men into Napoleon’s rear and to seize the Vistula crossings over which the French army drew its supplies. Unfortunately for the Russian commander, the French Emperor discerned the purpose of his enemy’s movements almost as soon as the Russians began their march and, in his turn, rushed to trap Benningsen’s force before it could escape east. The two armies: one retreating, and one driving forward in pursuit, crashed into each other at Eylau. And for the ordinary soldiers of the two opposing armies, the engagement could probably not have come at a worse time. The Battle of Eylau — taking place, as it did, in the dead of the Polish winter — is still remembered for the unbelievably miserable conditions under which the two armies were forced to fight. The almost featureless battlefield was blanketed in four feet of snow, and much of the action of the two-day battle occurred during a raging blizzard. Given the awful conditions that obtained during the action, Omar DeWitt’s treatment of the battle is uncomplicated, but interesting. To keep things simple and historical, the starting set-ups, as well as the reinforcement times and entry hexes for both armies, are all stipulated in the rules. In addition, because the rivers and lakes are all frozen, only town, ridge, road, and forest terrain hexes affect movement or combat. Stacking is limited to one unit per hex. And almost unique among this family of games, EYLAU — much like Avalon Hill’s now-aging WATERLOO (1962) — includes no “Demoralization” rules; so both sides tend to slug it out to the bitter end. Also, to add a bit of historical color, the designer includes a few special rules to liven things up: one of these rules restricts Russian and French movement during the first few game turns; a second provides for a divisional “integrity” bonus in attacks; and a third rule allows players to reinforce certain eligible units with a “fresh” additional strength marker just prior to the phasing player’s combat resolution die-rolls. In addition, to replicate the incredible confusion and disorganization created by the blinding snow, the game also offers an optional “Weather” rule which adds a second die roll to each combat, a die-roll from which there is a one-third chance that the original outcome of the combat will be dramatically changed. The end result of all this is a fast-paced and exciting little game that is simple enough for beginners, but textured enough to appeal to experienced players. EYLAU is twelve game turns in length. Bob Jervis’ game, DRESDEN, is a simulation of the first major action to occur after the Austrian-brokered armistice between the French and Allies ended and Napoleon resumed his 1813 campaign to restore Gallic hegemony in Central Europe. The battle, which lasted several days, pitted a French army that ultimately numbered about 120,000 men, under Napoleon, against a substantially larger Allied force (estimated at 170,000) composed of Austrians, Prussians, and Russians, all under the command of Austrian Field Marshal Prince Schwarzenberg, at Dresden — then the capital of Saxony — on August 26th, 27th, and 28th, 1813. On its face, the Allied move against Dresden was — for Schwarzenberg, at least — fairly inspired: the Elbe city was both a major logistical center for French operations in Central Europe, and the capital of one of Napoleon’s few remaining allies, the King of Saxony. Unfortunately for Schwarzenberg’s troops, the French Emperor got wind of the Allied movement and dispatched a flying column of 20,000 men, under Gouvion Saint-Cyr, with the intention of reinforcing Dresden’s small garrison before the Allies could reach the city. The Emperor’s gamble paid off and Saint-Cyr’s men reached Dresden with just enough time left to establish rudimentary defensive works in and around the city before the first large-scale Allied attacks were thrown against them on the morning of the 26th. The French garrison, although initially outnumbered by almost eight-to-one, fought tenaciously and by late afternoon, substantial French reinforcements had begun to reach the battle area. At 1730 hours and with Saint-Cyr’s exhausted soldiers teetering on the verge of breaking, Napoleon took personal control of the battle and immediately threw four fresh French divisions against the Allied right; as additional French troops entered the city, they joined Saint-Cyr’s now reinvigorated men and soon these troops also surged forward to smash into the Allied center. By nightfall, all of the Allies’ hard-won gains from earlier in the day had been lost, and although Schwarzenberg’s total force now outnumbered Napoleon’s army at Dresden by over 50,000 men, it was the French Emperor, and not the Allied high command, that looked forward to a renewal of the battle on the coming day. DRESDEN is a curious entry in the NAPOLEON AT WATERLOO family of games because it is the only one in the series that really centers on a battle for control of a very large city. It is also somewhat unusual in that bad weather — in this case rain: which halves infantry for both attack and defense — exerts a powerful influence on play for more than a third of the game. Rules-wise DRESDEN veers away from EYLAU in several other important ways. For example, the French player, besides his regular forces, controls a small number of weak and completely immobile garrison units; moreover, limited stacking (two regular units, or two regular plus one garrison unit) is permitted. And there are a few other significant differences between the two games, as well: infantry and cavalry units that are neither demoralized nor surrounded when they are eliminated, for instance, are considered “disrupted” instead of eliminated and are returned to play on either turn 6 or turn 16 (whichever comes next); both armies are subject to fairly severe “Reserve” restrictions; also, Allied units, because of poor attack coordination, suffer a 1-column odds reduction whenever units of two or more nationalities combine in the same attack. Finally, the “Morale” rules are considerably more onerous in DRESDEN than in most other NAW-based games; this is because, while an army’s “Morale” level is increased every time one of its units advances due to a combat victory, that level is also decreased both as a result of combat losses and whenever one of its units is retreated or displaced as a result of combat. This last rule has two interesting effects on play: first, it means that an offensive, once it gains momentum, can be very hard to stop unless the defender can throw reinforcements into the fight; and second, massive low-odds attacks (e.g., 1 to 1s and 1 to 2s) are not nearly as appealing in DRESDEN as they are in some of the other games in NAW series. What all this seems to translate into when it comes to actually playing the game — unless, that is, I’m missing something crucial about the design — is that DRESDEN appears to be a very tough game for the Allies to win. This is not to say that the overall situation is not interesting; only that — in my view, at least — the combination of French interior versus Allied exterior lines, the stringent “Reserve” and “Demoralization” rules, and the penalty for Allied “Coordinated” attacks all combine to make things very, very challenging for the Allied player. And although I have rarely seen a match go that long, for what it’s worth, a complete game of DRESDEN is thirty-two turns long. The winner in both EYLAU and DRESDEN is determined by comparing the two sides’ victory points at the end the last game turn, and may take the form or a Decisive, Substantive, or Marginal Victory. A Draw is also possible. Victory points are typically accrued through the destruction of enemy combat strength points, the capture of certain important hexes, and, depending on which of the two games is being played, the meeting of other special requirements. NAPOLEON’S ART OF WAR includes the following components:
A FEW THOUGHTS ON THIS LATEST BATCH OF ‘ALSO RANS’As I noted in a previous post, installments in this seemingly endless collection of S&T game descriptions — starting with Part III in this series — have been organized to reflect a more orderly and complete list of magazine issues than was featured in either Part I or Part II of this project. Where gaps in the numerical sequence of S&T issues do appear, readers should assume that I have probably already profiled the missing magazine game in a separate post. Moreover, either because of fondness on my part, or because of the relative obscurity of several of the titles covered in this particular post, I have fleshed-out most of these profiles a little more than usual. That being said, I sincerely hope that my long-suffering readers will find this expanded treatment of S&T magazine/game descriptions both interesting and useful; particularly, as there are still a few more of these installments still to be published.Related Blog Posts
Subscribe to:
Posts (Atom)
Subscribe To
 Posts
All Comments
Posts
All Comments
Popular Posts
About Me
My Nephew Joe and Three Marine Buddies
|