THE NEXT WAR is a hypothetical simulation of a Warsaw Pact offensive against NATO forces in Europe in the late 1970’s. THE NEXT WAR was designed by James F. Dunnigan and published by Simulations Publications, Incorporated (SPI) in 1978. THE NEXT WAR is packaged in the large soap box format that SPI reserved, during this period, for its "super-sized" monster games.
HISTORICAL BACKGROUND"A shadow has fallen upon the scenes so lately lighted by the Allied victory. From Stettin in the Baltic to Trieste in the Adriatic an iron curtain has descended across the Continent."
Winston Churchill in a speech delivered in Fulton, Missouri, on March 5, 1946
 |
American cargo plane landing at Templehof
airport during the Berlin Airlift |
Almost from the day that the Nazi High Command formally surrendered to the victorious Allies in 1945, a now politically-partitioned Germany took on a dangerous new role as a key flash point for Cold War tensions between the Eastern Bloc, dominated by the Soviet Union, and the Western Allies, under the leadership of the United States. Inevitably, given their conflicting post-war political goals — particularly as they pertained to Eastern Europe and the Balkans — relations between the western democracies and the Soviet Union steadily deteriorated. Finally, on 24 June 1948, the Soviets blockaded Berlin by closing off all rail and road access to the city in an attempt to gain complete control of the divided former German Capital. The United States, Great Britain, and other members of the British Commonwealth responded with the Berlin Airlift. At its peak, the airlift was delivering over 13,000 tons of fuel and food to the beleaguered city every day. Clearly, the cooperation between East and West that had won the Second World War was at an end. However, one positive, if indirect outcome of the Berlin Airlift was the formation, on 4 April 1949, of the North Atlantic Treaty organization (NATO). Faced with an embarrassing political and military failure, the Soviets finally ended the blockade on 12 May 1949. However, they did not abandon their designs on achieving control of an economically resurgent West Germany.
 |
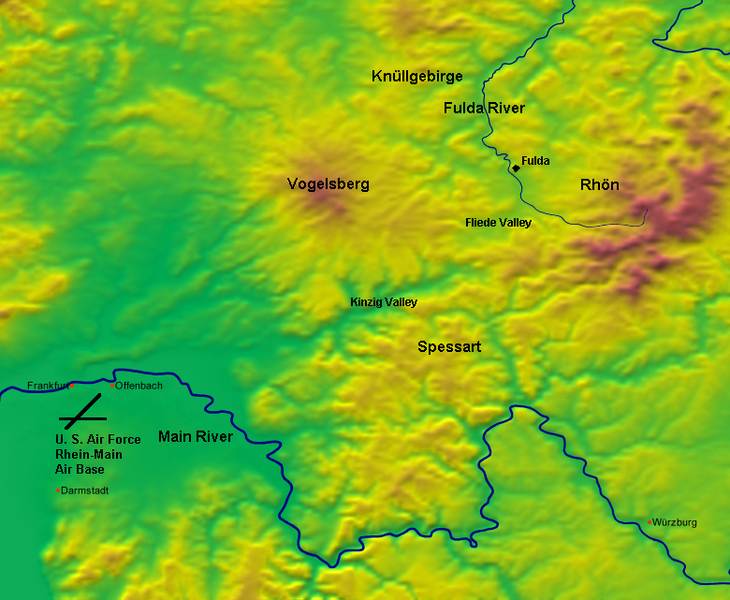
| Fulda Gap terrain features |
Originally, NATO was little more than an administrative organization composed of America and democratic Western European States, but with the outbreak of the Korean War in the early 1950’s, the military component of the organization quickly became the dominant feature of the coalition.
The Soviets, confronted with a strong and stable military alliance between Western Europe and the United States, reacted in kind; on 14 May 1955, the eight Communist Countries of the Eastern Bloc formed a military alliance of their own, known — because of the site chosen for the treaty’s formal signing — as the Warsaw Pact. Two great hostile military alliances now faced each other, one on each side of the “Iron Curtain.” Given the ongoing belligerence of the Communist leadership in the Kremlin; their ruthless suppression of the peoples of Eastern Europe, and their aggressive political adventurism in Africa and Latin America, the possibility of a Warsaw Pact invasion of Western Europe became, by the late 1950’s, a key feature of NATO planning as the Cold War continued.
The two most likely routes for a Soviet mechanized offensive into West Germany were obvious: the North German Plain, and the Fulda Gap. The British Army of the Rhine (BAOR) was entrusted with covering the North German Plain; while the US V th Corps was assigned the initial defense of the Fulda Gap. If the Soviets attacked without warning, these British and American formations would have to halt the Warsaw Pact offensive long enough for reinforcements from the other NATO countries to move up to the front. Permanently arrayed against these British and American trip-wire units were mechanized divisions from the Soviet, East German, and Polish Armies. The other Warsaw Pact countries, like the supporting NATO members, would be expected to send their own additional front line and reserve units into the battle area, once hostilities actually began.
 |
Soviet tanks supress the "Prague Spring"
uprising in Czechoslovakia, 1968 |
This simple East-West divide, however, was not as uncomplicated as it appeared on its face. In actuality, both military alliances presented daunting political and military challenges to their respective operational planners. In 1966, the French formally withdrew from NATO and, although Paris continued to coordinate military planning with NATO headquarters in Brussels, the other member countries — particularly Britain, West Germany, and the United States — had serious reservations about French intentions if a Soviet attack were to come. In the East, the Russians had problems of their own. Because of the brutal Soviet suppression of popular uprisings in Poland, Hungary, and Czechoslovakia, Warsaw Pact planners could not be sure of the loyalty of these nations’ military contingents should war break out; particularly if their military operations did not meet with obvious initial success. Thus, if war came again to Europe, both NATO and Soviet planners would have to worry both about the actions of their enemy and the reliability of at least some of their allies.
DESCRIPTIONTHE NEXT WAR: Modern Conflict in Europe is a hypothetical (quasi-historical) simulation, at the brigade/division level, of a major military conflict between NATO and the Warsaw Pact for possession of what was then West Germany, and by extension, for political control of the rest of Western Europe. The scope of the game is enormous. Units from sixteen different countries are present in the counter mix. The game maps cover a battle space that extends from the northern tip of Denmark, through Germany and Austria, to Northern Italy; in addition, they display fourteen different types of militarily significant terrain. The game’s design includes virtually every significant aspect of 1970’s warfare that was known (at least to the general public) at the time of the game's publication. THE NEXT WAR is a land-sea-air simulation, but the rules for the land war, as might be expected, form the core of this complex game design. Many of the rules for the land game are familiar: step reduction, headquarters-based supply, movement modes for combat units, limited intelligence, and unit break-down and build-up, to name only a few.
One unusual design feature of THE NEXT WAR — at least for its time — is that combat is treated as a function of movement, and occurs in a series of engagements during the course of the movement phase, as individual units move into contact with the enemy. In the basic “fast game” versions of the design’s shorter scenarios, air and naval operations can be dispensed with completely. However, despite the game’s emphasis on the ground war, the air and naval campaigns have not been short-changed. The elaborate subroutines for air and naval combat operations are so richly detailed, that they both can almost stand alone as independent games outside of the larger integrated simulation. The Air Game involves allocating hundreds of units to specific airfields and sectors along the front. From these airbases, the air units of the two combatants conduct a variety of different air missions, such as (but not limited to): air supremacy, CAP, air-to air, air-to-ground, air-to-naval, ground support, and air reconnaissance. The Naval Game, on the other hand, focuses only on naval operations in the Baltic Sea and Denmark Straits, and offers, in terms of maneuver tempo and combat, a completely different gaming experience from that of the air or land games.
 The game turn sequence, I believe, tells players a great deal about what they should expect from THE NEXT WAR. The basic “land war” turn sequence is quite simple: Warsaw Pact Reinforcement Phase, Replacement Phase, Movement/Combat Phase; NATO Reinforcement Phase, Replacement Phase, Movement/Combat Phase; and Game Turn End Phase. This “fast game” introductory rules system allows players to gain experience with the map features and combat system before moving on to the “advanced” game. The advanced turn sequence, of course, is where all of the design and development time that went into THE NEXT WAR really shows. An "advanced" turn proceeds, as follows: Weather Phase; Joint Nuclear Planning Phase; Air Allocation Phase; Air Combat Phase; Nuclear Strike Stage (multiple phases); Warsaw Pact Land Stage (six phases); NATO Land Stage (six phases); Naval Stage (seven phases); and (game turn) End Phase. It is easy to see, after looking at the “advanced” turn sequence, that THE NEXT WAR is a big game, not only because of size, but also because of the ambitiousness of its design. Jim Dunnigan was clearly trying to push the game design envelope to the limit with this project; whether he succeeded, I leave to others to decide. What is particularly interesting for me, is that only five years separated the 1973 publication of NATO, and only four years, the 1974 publication of WAR IN THE EAST (1 st ed.), from that of THE NEXT WAR. Obviously, a lot happened at SPI, and in the rest of the world of conflict simulation design, in those few short intervening years.
THE NEXT WAR offers six short scenarios, and three campaign game scenarios. The six (comparatively) short scenarios are, as follows: the Berlin Scenario (five or fewer game turns); Vienna Scenario (five or fewer game turns); Baltic Scenario (10 or fewer turns); the Fulda Scenario (10 or fewer game turns); North German Plains Scenario (12 game turns); and the Main Front Scenario (12 game turns). Each of the short scenarios focuses on a limited section of the potential NATO-Warsaw Pact front, and uses only the units assigned to that sector of the battle area. You can play any of these short scenarios as a “fast” game using just the basic rules, or as an “advanced” game, using some or all of the optional rules. The three campaign games use all of the map sections and all of the available forces of the two belligerents. The designer — as might be expected — recommends that players become thoroughly familiar with the unusual features of the game system, and with the optional rules they intend to use, before attempting any of these longer, more complex games. The three campaign game scenarios are all thirty turns long, and differ only in the readiness situation at the start of NATO-Warsaw Pact hostilities. The three campaign game scenarios are: the Sudden War Scenario (a surprise attack by Warsaw forces with no prior buildup); Spring Maneuvers Scenario (Warsaw Pact forces on maneuvers suddenly take the offensive for real); and the Tension Scenario (in which both sides mobilize, because of political tensions, in advance of hostilities).
A PERSONAL OBSERVATIONJames Dunnigan's THE NEXT WAR — or, as one of my regular opponent's quickly took to calling it, PANZERGRUPPE GUDERIAN meets TERRIBLE SWIFT SWORD — is an ambitious, even hubristic attempt by the prolific head of SPI to reproduce, in game form, a 1970's era military clash between the Warsaw pact and NATO that, thankfully, never actually occurred. As such, it attempts to include virtually every military component that — it was thought, at the time — would be relevant to air-ground-sea combat operations if the Cold War had suddenly turned "hot". Needless-to-say, with design goals like these, it was probably inevitable that the actual game, whatever its final form, would be somewhat controversial within the gaming community. And this has pretty much been the case ever since the game first appeared way back in 1978.
Among the many monster game players who, after giving Dunnigan's take on continent-wide modern warfare a try, decided that they didn't like his game design, three criticisms tended to recur with surprising consistency: first, they pointed out that the ground combat CRT was both asymmetrical and counter intuitive (it sometimes made sense, for example, to attack at lower rather than at higher odds); second, the rules integrating air-ground operations were cumbersome, while those for naval operations were downright unworkable; and third, whatever its other virtues, the basic architecture of the game — once the fighting actually started in earnest — quickly tended to be swamped by a "tidal wave" of different (and confusing) die-roll modifiers.
Dunnigan's new monster game, however, was not without its defenders. Thus, those players who really liked the game (and I count myself in this category), although quick to acknowledge the validity of some of THE NEXT WAR'S playability problems, responded to the critics by pointing out that the game's "positives" far outweighed its "negatives". Yes, the CRT sometimes seemed counter intuitive, but so what? THE NEXT WAR was not the first SPI game to make use of non-linear combat results, and most certainly would not be the last. And certainly the integration of air-ground-sea operations in the game was, at times, disappointingly complicated if not actually "clunky"; still, with practice, the air-ground subroutines could be made to work together relatively well; and even the naval subroutine (and in this instance, I know whereof I speak) — with a little bit of effort and creativity on the part of the players — could be integrated fairly well into the overall dynamic of the game. The third playability problem — that the large number of die roll "modifiers" required to compute combat outcomes was excessive and needlessly cumbersome — was probably the one criticism that was most difficult to refute. Yet, even in this case, the argument could be made (and often was) that this was more a matter of degree than of substance; and that a similar criticism had earlier been leveled at Richard Berg's TERRIBLE SWIFT SWORD (1976) without markedly affecting the game's appeal to those gamers genuinely interested in a highly-detailed tactical treatment of the "Battle of Gettysburg". So why should the player response to this game be any different?
One interesting idea to emerge — at least in some gaming circles — during the years that followed the initial release of THE NEXT WAR, was for (truly ambitious) players to graft key elements from the rules package of Mark Herman's excellent, if highly derivative, GULF STRIKE (1983, 1988, and 1990) onto the basic platform of the older Dunnigan design. Because of the obvious connection between the two games, I thought at the time that this might well be a workable idea; however, for my own part, such a project seemed then (and still does, three decades later) like it would probably be more trouble than it would actually be worth.
Visually, THE NEXT WAR, when it is laid out and set up for play, is an awesome game to behold. The maps are — thanks to the indefatigable Redmond Simonsen — both chock full of information and yet still attractive to the eye. The game charts and tables are easy-to-use, if a bit utilitarian. And the two thousand plus counters, although back-printed in the typical SPI matte-finish style, are both readable and colorful enough to be interesting. The rule book, at over thirty pages of relatively small print, is admittedly a slog the first couple of times through; nonetheless, it is generally well-organized, and, with a bit of practice, players can usually find a "sought after" rules case comparatively quickly. One particularly nice feature of the game package is the extensive Order of Battle information for both NATO and the Warsaw Pact forces that has been included. In the opinion of at least one of my gaming friends back when the game first appeared, the research incorporated into the OoB work, alone, was worth the price of the game.
Visual appeal and size, of course, will only take a design so far when it comes to its value, both as a game and as a simulation. The graphic presentation, and the sheer scale of the game, however, are not the only elements that — to my mind, at least — make this title a "winner". In addition, the texture and historical richness of the overall game system also make this ground-breaking design a worthwhile title for any player interested in modern (post-World War II) combat operations.
The optional rules included with THE NEXT WAR are so numerous and detailed that it would take an additional page, just to catalog them. Suffice to say that if SPI could glean, from unclassified sources, the characteristics of a new weapons system, operational doctrine, or special combat capability, then those militarily-relevant factors probably found their way into the rules for THE NEXT WAR. It goes without saying that, for many gamers, all this information and the operational detail that it inevitably adds to the design's basic rules architecture means that actually mastering the game system — with its many phases and subroutines — is a bit of a chore. But, I submit that, for those who are genuinely interested in modern military affairs, it is a chore that is well worth undertaking. THE NEXT WAR may not be the perfect simulation of large-scale conventional (and possibly tactical nuclear) European warfare in the late 20 th century, but — in my view, at least — it still does a surprisingly good job of "delivering the goods", both as a simulation and as a game. And considering that this SPI monster was first published thirty-four years ago, that is pretty impressive, in and of itself.
Clearly, given the sheer volume of simulation detail that it contains and its complexity, this Dunnigan opus is most definitely not a game for the novice or, for that matter, even for the casual player. However, I can think of no better, more comprehensive simulation of large-scale, 1970’s combat operations in Europe than THE NEXT WAR. For this reason, if for no other, (and it should be noted that it is actually a "blast" to play) I consider it to be a must own for those gamers with a serious interest in recent contemporary history, or for those with an abiding curiosity about what a conflict between the Warsaw Pact and NATO might have looked like, had it actually occurred.
Design Characteristics:- Time Scale: 2 days per game turn (land game); 4 hours per game turn (naval game)
- Map Scale: 14 kilometers per hex
- Unit Size: battalion/regiment/brigade/division, air squadron, individual ships, naval flotillas
- Unit Types: army/corps headquarters, division base, mechanized infantry, armor, airborne infantry, air mobile infantry, alpine (mountain) infantry, marines, armored cavalry, special forces, assault engineers, field force, artillery, surface-to-surface missile, fixed ADA (SAM), mobile ADA (SAM), electronic warfare, railroad regiment, front supply head, fighter aircraft, bomber, reconnaissance aircraft, transport, attack helicopter, transport helicopter, PT boats, mine layers, minesweepers, submarines, destroyers, guided missile cruisers, naval air, and information markers
- Number of Players: two (teams highly recommended)
- Complexity: above average/high
- Solitaire Suitability: low
- Average Playing Time: 6-200 + hours (depending on scenario, and assuming experienced players)
Game Components:- Three 22” x 34” hexagonal grid Map Sheets (with Turn Record Track, Terrain Key, Die Modification Record, Movement Point Expenditure Track, NATO Airbase Holding Boxes, NATO Task Force Boxes, Port Boxes, Warsaw Pact Airbase Holding Boxes, and Warsaw Pact Task Force Boxes incorporated)
- One 8½” x 11” hexagonal grid Map Extension (with Naval Turn Record Track incorporated)
- One 8¼” x 10½” hexagonal grid Map Extension (with Off Map Movement Tracks incorporated)
- 2400 back-printed ½” cardboard Counters
- One 8½” x 11” Rules Booklet
- One 8½” x 11” Scenario and Situation Briefing Booklet (with Scenario Instructions, Different National OoB’s, Movement Point Costs Charts, Land Combat Results Tables, Weather Tables, Positive Air-to-Air Combat Results Tables, Zero Air-to-Air Combat Results Tables, Negative Air-to-Air Combat Results Tables, Nuclear Combat Results Tables, Nuclear Contamination Tables, FLAK Combat Results Tables, FLAK Suppression Tables, Naval Movement Costs Charts, Naval Combat Results Tables, Air-to-Ground Combat Results Tables, Sweep Results Tables, Special Forces Vertical Assault Tables, Special Forces Assault Tables, Mine Results Tables, and Air Superiority Level Tables incorporated)
- One 17” x 22” perforated (for separation) NATO and Warsaw Pact Air Allocation Display
- One 8½” x 11” Errata Sheet (August 7, 1978)
- Two small six-sided Dice
- Two 8¾” x 11½” flat 20 compartment plastic storage Trays with clear plastic covers
- One SPI 9” x 11¾” x 4” soapbox style cardboard Game Box
Read On
NAPOLEON'S LAST BATTLES is a set of four games, each of which simulates a different battle in Napoleon's short-lived 1815 campaign against the British and Prussian armies in Belgium. Each of the games that make up the NAPOLEON'S LAST BATTLES Quadrigame can be played individually, or they can be combined to allow players to simulate the entire three-day campaign. The four major engagements depicted in this collection are the battles of LIGNY, QUATRE BRAS, WAVRE, and LA BELLE ALLIANCE (WATERLOO). All of the games in this set, including the CAMPAIGN GAME, were designed by Kevin Zucker. NAPOLEON'S LAST BATTLES was first published by Simulations Publications, Inc. (SPI) in 1976. This game was later reissued (with some modifications), first under the TSR label, and then by Decision Games.
HISTORICAL BACKGROUND
 |
Napoleon addresses his Guard,
Battle of Waterloo |
Napoleon Bonaparte's fateful decision to cross into Belgium at the head of a French army on June 15, 1815 was — based on the cold realities of France’s strategic situation — probably his only viable option. Military action was clearly required; diplomacy was, at least temporarily, out of the question. The Emperor's former enemies, by their rapid and hostile response to his reappearance in France, had made it abundantly clear that they would not tolerate his return to the throne. Thus, after Bonaparte’s surprise escape from exile on Elba and his triumphant arrival in France on March 1 st 1815, the member nations — England, Prussia, Austria, and Russia — of the same reactionary Great Coalition that had defeated and deposed him over eleven months earlier, quickly scrambled — within the space of a few days — to convene an emergency meeting in Vienna to deal with the renewed French threat. From Vienna, they formally declared Napoleon to be an “outlaw” and demanded his abdication and the restoration (yet again) of the Bourbon monarchy. To back up their demands of March 13 th — which they knew Bonaparte would disregard — the individual member nations of the Coalition pledged to immediately begin to raise fresh armies of 150,000 men each for a renewed war against the “Corsican Ogre”.
 |
Field Marshal Prince
Blücher von Wahlstadt |
The first of the Seventh Coalition armies to actually take the field in anticipation of the coming war with France were those of Prussia and Britain. By June, 1815, the Anglo-Allied Army under Arthur Wellesley, Duke of Wellington, and the Prussian Army, commanded by Field Marshal Prince Blücher von Wahlstadt, had massed most of their troops in Belgium near the French border. To the east, the Austrians were assembling another army which, when formed, would equal or exceed the size of Napoleon’s own. To make matters worse, farther to the east, the Tsar was also mustering new troops whose strength, when ready to march, would equal that of the Austrians.
Confronted by an alliance that, when fully assembled, would outnumber his own forces by more than four-to-one, Napoleon decided to strike first. Gathering what available troops could be spared from other fronts, some 123,000 men in all, Napoleon force marched his newly-raised Armée du Nord towards the enemy encampments near the French border and, on the 15 th of June, stole across the Sambre River into Belgium. Once his army had advanced within striking-distance of his enemies, Bonaparte’s plan of campaign, based on his theory of the “central position,” was simple: he would drive the Armée du Nord between the dispersed bivouacs of Wellington and Blücher, and then defeat each enemy army in turn before they could combine their forces against him.
DESCRIPTION
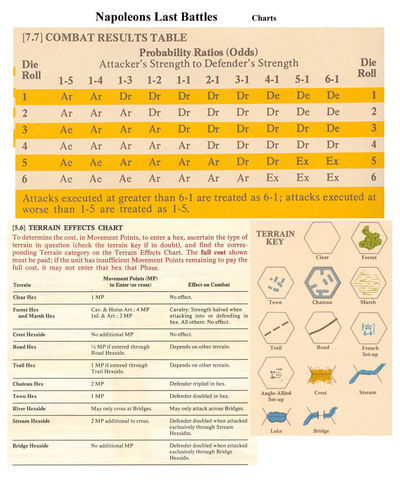
NAPOLEON'S LAST BATTLES is a grand-tactical (brigade level) simulation — based on the popular NAPOLEON AT WATERLOO Game System — of the four separate battles fought between Coalition and French forces during Napoleon's short-lived 1815 campaign against the Prussian and British armies in Belgium. The combat units represent the actual military formations that took part in the historical campaign, and up to two combat units (unlike some other NAW-based titles) may stack together in the same hex. Each of the four-color game maps depicts one of four different areas in Belgium over which the opposing armies maneuvered and fought during the most critical days of the campaign; that is: the period beginning with the 16 th and running through the 18 th of June, 1815. The terrain displayed on the game maps is relegated to ten different types: Clear, Forest and Marsh, Crest Hexsides, Roads, Trails, Chateaux Hexes, Towns, River Hexsides, Stream Hexsides, and Bridges. Roads accelerate movement, trails and bridges allow movement through otherwise difficult (or blocking terrain), and forests and marshes slow movement and also halve the attack or defense strength of cavalry units. Towns, streams, and bridges double the strength of any defending units occupying them. "Chateux" hexes represent a special case: these virtual fortresses permit no stacking, but do triple the defense strength of any single INFANTRY unit (only) garrisoning them. In addition, these defensive hexes cannot be bombarded and adjacent enemy units need not be attacked by units in chateux hexes. Infantry units defending in chateux hexes also enjoy other defensive advantages: enemy attacks at 4 to 1 or greater odds are resolved as 4 to 1's, and retreat results do not affect the defender.

The specific game-related actions of each player in NAPOLEON'S LAST BATTLES are organized into a sequence of game turns which are composed of a French and a Prussian and/or Anglo-Allied player turn. Each player turn is further divided into a Movement Phase followed by a Combat Phase; the French player is always the first to act in all scenarios and in the Campaign Game. Game turns, because of the multi-day duration of the campaign, are of two types: "daylight" game turns which represent one hour of real time; and "night" game turns which are three hours in length. As is typical of other games in this series, zones of control (ZOCs) are sticky, and units may only exit an enemy ZOC as a result of combat (either through retreat or elimination). Combat between adjacent enemy units is mandatory, and the phasing (attacking) player must engage all enemy units which are adjacent to his or her own. Combat may, at the discretion of the phasing player, take one of two forms: direct assault (with adjacent units of any type); and bombardment attacks (which may be conducted by artillery units at a range of two hexes). In all attacks in which the defender is either eliminated or forced to retreat — with the single exception of assaults against "chateaux" hexes — the attacker may (but is not required to) advance ONE of the victorious attacking units into the newly-vacated hex.

The Combat Results Table of NAPOLEON'S LAST BATTLES is heavily weighted in favor of "attacker" and "defender" retreats, and neither "defender elims" ( D elim) nor "exchanges" ( Ex) appear until the attacker has achieved odds of 4 to 1 or better. Because of the relatively "bloodless" nature of the game's CRT, the key to tactical success in NAPOLEON'S LAST BATTLES, as it is in the other games of this series, is the "surrounded" attack: that is, a planned sequence of assaults in which the phasing player uses successful advances from other attacks to surround a target unit with units and ZOCs and, via a subsequent retreat result, eliminate it.
In addition to the game's Standard Rules, NAPOLEON'S LAST BATTLES also includes a pair of "Optional Rules" which can be added, at the players' discretion, in the interests of added realism. These special "Optional" rules are: the Combined Arms Attack rule which permits the attacker to shift the odds of any attack one column to the right (i.e., a 1 to 1 becomes a 2 to 1) if the target hex is being assaulted by a force containing infantry, cavalry, and artillery; and the Imperial Guard rule which stipulates that if any infantry unit (Guard cavalry and artillery units are exempt) belonging to the French Imperial Guard is involved in a combat that results in an "attacker elim" ( A Elim), an "attacker retreat" ( AR), or an "exchange" ( Ex), the French Demoralization level is immediately reduced by twenty points. It should be noted that, in the course of regular play, both "Optional" rules actually tend to benefit the P.A.A. player; nonetheless, once players have become familiar with the basic game system — because these rules add an interesting (and challenging) element of historical "realism" to the game — it is strongly recommended that both be incorporated into play.
Players win in NAPOLEON'S LAST BATTLES by inflicting a certain level of casualties on the opposing force or forces. This casualty requirement will vary from scenario to scenario, and from army to army. Moreover, it can take one of two forms: Demoralization, which, in the case of the French, results in their immediate defeat, but in the case of both the Anglo-Allies and the Prussians merely eliminates their ability to advance after combat; and Disintegration (requiring a higher number of casualties than that of Demoralization) which immediately signals the defeat of the P.A.A. force or forces involved in the action.
The four games that make up the NAPOLEON'S LAST BATTLES Quadrigame — as previously noted — all utilize a similar mix of game components, and all are governed by the same set of Standard Rules. However, because the circumstances in each of the four historical engagements are different, each simulation also lists its own short set of Victory Conditions (typically in the form of "Demoralization" and "Disintegration" levels) specific to that game. Needless-to-say, this uniformity in design makes it effortless to move from one game to the next in this set without requiring the players to do any additional preparation or study. Moreover, each title, although similar to its counterparts in structure and presentation, still offers a different and unique gaming experience. And for those players who have both the time and the desire to refight the entire campaign, NAPOLEON'S LAST BATTLES offers that option as well. The Campaign Game, however, unlike the shorter scenarios, utilizes all four game maps, all of the historical units from all three armies (a unit manifest is included with the special Campaign Game rules), and covers the most critical three days that followed Napoleon's crossing of the Sambre into Belgium in 1815. In addition, the expanded game also introduces new (and fairly detailed) rules to cover command and control, supply, and post-combat unit reorganization. Finally, it should be noted that the simulations in this series are all designed to be about average in complexity, and playing times for the shorter, one-map games will typically vary from two to three hours; playing time for the four-map, thirty-seven turn Campaign Game, on the other hand, will typically run about fifteen hours or more.
THE INDIVIDUAL GAMES
LIGNY (16 June 1815)
is a simulation of the first major battle of Napoleon's 1815 campaign. The Prussian commander, Field Marshal Prince Blücher von Wahlstadt — instead of retiring in the face of the unexpected French advance — chose to offer battle near the town of Ligny. The Prussian positions were generally strong with the main part of the Prussian army deployed around the village of Ligny and on the high ground to the northwest of the town. As a further barrier to enemy movements, a series of shallow streams wove through and around the town; collectively these were known as Ligny Brook. In addition to favorable terrain, Blücher's command, which totaled about 84,000 men and 224 guns, actually outnumbered the opposing French forces, which numbered only 75,000 men and 212 guns. Nonetheless, the French — under the personal direction of Napoleon and undeterred by their foe's numerical advantage — commenced an assault against the Prussian line at about two o'clock in the afternoon. For much of the day, the Prussians held their attackers at bay; however, because of the exposed positions of many of the Prussian units, the French artillery was able to exact a terrible toll on Blücher's troops. By evening, the Prussians had committed the last of their reserves and the entire army was nearing the limit of its endurance; at this point, and with the light rapidly fading, Napoleon ordered the elite infantry of the Imperial Guard forward supported by a division of heavy cavalry. The Prussian line bent and then buckled in the face of this last ferocious assault. Fortunately for Blücher, who had been injured when his horse fell on him late in the action, darkness allowed the beaten Prussians to withdraw unmolested and in relatively good order: the victorious French were too exhausted to organize a pursuit until the next morning. Prussian losses were heavy with probably somewhere between 12-20,000 killed, wounded, and captured, while another 8-10,000 abandoned the fight completely and deserted for home. French casualties were considerably lower, with most estimates placing Napoleon's losses at around 6,500-7,000 men killed and wounded. Ligny, there can no doubt, was a significant French tactical success; unfortunately, it had not been the decisive victory that Napoleon had needed. The Prussian army had been badly mauled; but its escape under cover of darkness guaranteed that it would survive to fight another day, and that day would come much sooner than Napoleon expected.

QUATRE BRAS (16 June 1815)
depicts the action at Quatre Bras between the advanced guard of Wellington's Anglo-Allied army (ultimately reinforced to about 36,000 men) and the left wing of the Armée du Nord (approximately 25,000 men) under Marshal Ney. Napoleon had instructed Ney to take possession of the vital crossroads at Quatre Bras to prevent Wellington from coming to the aid of his Prussian ally at Ligny. Unfortunately for the French, Marshal Ney, unsure as to the local strength of the Coalition forces to his front and awaiting reinforcements, postponed action for several critical hours. Finally, with no sign of the additional troops he had been promised (they were marching and counter-marching back and forth between Ligny and Quatre bras and would end up taking part in neither battle), Ney opened his assault at about 3:00 pm with a series of tentative and piecemeal attacks against what was, in the beginning, an out-numbered British (and Dutch-Belgian) detachment. The initial French advantage in rifle strength did not last, however, and although Ney's attacks were gradually able to push the enemy line back during the afternoon, the arrival on the scene both of the Duke of Wellington and of substantial Anglo-Allied reinforcements finally allowed the British, as evening approached, to counterattack the French all along the front. This assault, coming as a surprise to the tiring French troops, quickly succeeded both in wresting the initiative away from Ney, and in throwing the French back from all of the hard-won positions that they had gained earlier in the day. Ney's troops had had enough for the day, and fighting finally sputtered to an end at nightfall.
 |
| Battle of Quatre Bras |
Somewhat surprisingly, word of Blücher's defeat at Ligny and of his subsequent retreat did not actually reach Wellington until mid-morning on the following day. When it finally did arrive, however, its implications were dire: it meant that Wellington's position at Quatre Bras was no longer tenable and that a general withdrawal was now necessary. In spite of his danger, the "Iron Duke" held his forces at the crossroads, and did not actually order their retreat to commence until early in afternoon on the 17th
. While Wellington dithered away the morning — and in one of those inexplicable occurrences that seem to happen in wartime — Ney's forces, which were still bivouacked near Quatre Bras, made no move to interfere with the activities of the decamping British; yet, had Ney only renewed his attack before noon, then he would have pinned the Anglo-Allied army long enough for the rest of the Armée du Nord to arrive and overwhelm Wellington's greatly out-numbered forces. Such a French victory, on top of the one at Ligny, would have ended the campaign there and then. Fortunately for the British, the nearby French troops, instead of attacking, spent the morning around their campfires peacefully tending to the preparation of their breakfasts, while their commander — apparently oblivious to the opportunity that was unfolding before him — ordered no offensive action at all. Ney's failure to act throughout the morning of the 17 th would be one of the great "missed opportunities" of the campaign; unfortunately for the French Emperor, however, it would not be the last. So far as the action at Quatre Bras, itself, is concerned, although the numbers of troops involved in the fight for the crossroads were relatively small and the action short, both sides still lost approximately 4,000 men killed, wounded, and missing. Interestingly, the battle, while inconclusive could, in the end, be considered a French success: the British managed to retain possession of the crossroads, but they were, as Napoleon hoped, prevented from intervening on behalf of their ally at Ligny on the 16 th.
WAVRE (18 June 1815)
is a simulation of the battle between the right wing of the Armée du Nord, under Marshal Grouchy, and the Prussian rear guard, under General Baron von Thielmann. The troops under Thielmann, which numbered somewhere between 17,000 and 27,000 men (estimates vary widely), were tasked by Theilmann's commander, Marshal Blücher, with tying up the 33,000 men under Grouchy while the rest of the Prussian army marched to the aid of the Anglo-Allies at Waterloo. In this, the Prussian commander was successful. Grouchy, in one of the most controversial (if not incomprehensible) decisions of the entire campaign, chose — instead of immediately marching to the sound of the guns at Waterloo — to attack the Prussians to his immediate front. The casualties of the two armies were comparatively light; both the French and Prussians each losing only about 2,500 men killed and wounded. The battle of Wavre ended with a modest French victory, but Grouchy's chance to change history had slipped away. Instead, while his troops fought a largely pointless action against Thielmann's delaying forces at Wavre, the fate of the entire campaign was being decided on another battlefield only a few miles away.

LA BELLE ALLIANCE (18 June 1815)
depicts what is, perhaps, the most famous military engagement in European history, the Battle of Waterloo. The site at which the battle was fought, interestingly enough, had actually been pre-selected by Wellington during a tour of the Belgian countryside in the weeks leading up to the battle. The presence of several walled chateaux and the gently undulating lay of the ground had convinced the British commander that this patch of terrain offered excellent defensive advantages to the British and their Dutch-Belgian allies if they should ever be obliged to mount a defense of the Brussels Road. The site had only one worrisome defect: the forests that would likely be at the backs of a defender's lines would make the orderly retreat of an army from the battlefield, if it were defeated, next to impossible.
On the morning of 18 June 1815, the two opposing hosts, after having spent a rain-soaked night within earshot of each other, formed for battle. Wellington's polyglot army — which was composed of British regulars, Belgians, Dutch, and Nassauers — deployed along a low-lying set of ridges and in two walled chateaux (known locally as Hougomont and La Haye-Sainte) on the north side of the battlefield, while the French army took up positions along the high ground to the south. A shallow valley, cloaked with sodden rye grass, separated the two forces. In total numbers, the two belligerents were not that unevenly matched. Wellington commanded a force of some 24,000 British and 43,500 allied troops (approximately 67,700 men, in total) along with 156 guns; Napoleon's army was slightly larger, numbering roughly 72,000 Frenchmen with 246 guns. Although estimates of times vary, the two armies had probably largely completed their dispositions sometime around 9:00 am. Then, having taken their respective places on each side of the battlefield, an unexpected quiet settled over the massed ranks of both armies. Everyone stood stoically by and waited.
 |
Wellington directs deployment from his
famous position under the tree |
The one that everyone, on both sides of the battlefield, waited for was Napoleon. The French Emperor had earlier inspected the rain-soaked fields of rye and, after conferring with his senior officers, had decided to delay the start of the French attack until the muddy ground had dried sufficiently that it would not seriously encumber his artillery and cavalry: the two arms in which he had a pronounced advantage over his British adversary. This decision, by Napoleon, to postpone the start of the battle would have fateful consequences later in the day. In the meantime, the "Iron Duke", having watched the French stand silently in their serried ranks for a time, dismounted and lay down to rest under a tree near the center of the British lines. Minutes turned into hours and then at 11:00 am — so unexpected as to be almost shocking — the sound of an artillery cannonade suddenly erupted on the French left. The one and only battle that would pit the two greatest generals of their age against each other had finally begun. And with its start, the fate of two great empires now depended on what would happen, in this small corner of Belgium, in the course of the next few hours.
A PERSONAL OBSERVATION
The NAPOLEON AT WATERLOO Game System, as I have noted a number of times before, is probably one of the most successful conflict simulation design platforms ever created. Besides being used in numerous SPI (and other publishers’) Napoleonic games, it has also been the foundation for the SPI BLUE & GRAY Civil War Quadrigames; in addition, it has showed up in at least one WWII title, BATTLE FOR GERMANY, and it has even appeared in a modern naval game, SPI’s 6th FLEET. These games, whatever their differences, all share many of the same characteristics: they are easy and comparatively quick to play, full of action, and they usually model interesting and historically significant conflict situations.
 |
| British guards defending Hougomont, Battle of Waterloo |
Such is the case with NAPOLEON'S LAST BATTLES. It would be difficult, even taking into account all of the military campaigns that have colored European history — both before and after Napoleon's ill-fated gamble in the spring of 1815 — to think of another military clash that possesses the same unique historical cachet, and the same sense of high drama as the Waterloo Campaign. Moreover, no other sequence of military actions has provoked more nagging what if (?) questions than those raised by the mistakes and bad luck that plagued Bonaparte's audacious and nearly successful attempt to save his throne in June of 1815. It is no wonder, then, that the Waterloo Campaign has been an obvious topic for game designers going all the way back to Avalon Hill's publication of Thomas Shaw's and Lindsley Schutz' WATERLOO in 1962. Thus, when it comes to Kevin Zucker's design treatment of this popular topic, the only real question to be asked is: does the modified NAPOLEON AT WATERLOO Game System used in this design offer players enough historical detail to permit the Campaign Game in NAPOLEON'S LAST BATTLES to work, both as a game and as a simulation. In my view, the answer is an emphatic, yes. There are, to be sure, far more detailed and, I would say, cumbersome simulations of the 1815 Campaign than this one available to those gamers who prefer a more complex simulation of the events of June 1815. However, for those players who are looking for a game with enough size and scope to simulate the entire campaign, but who do not want to commit months of their lives to a single gaming project, Kevin's design is probably for you. What I mean by this is that, almost alone among the many grand-tactical, multi-map monster games dealing with famous Napoleonic campaigns that are available today, this title is one of the very few that doesn’t require weeks of preparation and rules study before players feel knowledgeable enough about the game system to finally sit down and play.
 |
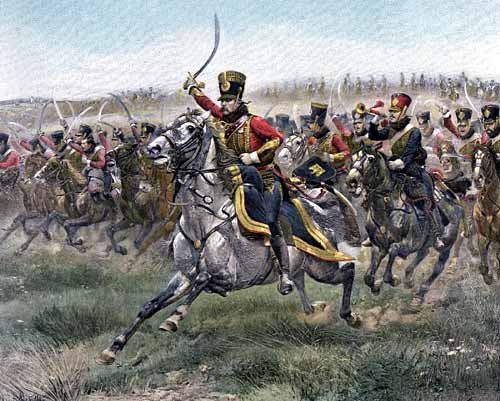
| French cavalry attack |
Of course, along with a game's basic design platform, other factors also heavily weigh on whether a game will generate interest among the ranks of the gaming public. And since appealing graphics have become a steadily more important feature in game designs in recent years, I feel obliged to at least touch on the overall quality of the graphics in NAPOLEON'S LAST BATTLES. Given that the game was originally published in 1976, it should come as no surprise that it is not as visually striking as some of the newer Napoleonic titles currently making the rounds among gamers; nonetheless, in my view, the game's graphics presentation is both reasonably attractive and functional. The maps, as is typical of Simonsen's work during this period, are both nicely-rendered and unambiguous. The counters are simple but clearly-printed. And not inconsequentially, the Rule Books are well-organized and clearly-written, and the various charts and tables are all both easy-to-read and readily accessible. Finally, different players have different opinions when it comes to the old SPI plastic "flat pack" which, it turns out, was the original packaging used for NAPOLEON'S LAST BATTLES. Personally, I happen to like them, but for those gamers who don't, later versions of the game were packaged in cardboard boxes, rather than "flat packs".
 |
| Marshal Ney at Waterloo |
So where does all this leave us when it comes to Kevin Zucker's (multi-map) take on the Waterloo Campaign? Certainly, as I indicated previously, NAPOLEON’S LAST BATTLES is not a particularly complicated game; yet, I believe that it does have enough historical ornament to be satisfying to any but the most dedicated, detail-obsessed monster game fanatics. Moreover, what it lacks in operational “nitty-gritty,” it more than makes up for in ease of learning and playability. Granted, this may not be the definitive conflict simulation of the Waterloo Campaign, but it is a heck of a lot of fun to play; and with four unique game situations, as well as the much longer Campaign Game, different battlefield strategies seem to emerge every time you begin the game anew. For this reason, I strongly recommend this title, both for those experienced players interested in the Napoleonic Wars generally, but also for casual gamers who enjoy a challenging, fun game that doesn’t require hours to figure out or to learn. For those players who are particularly interested in Napoleon's 1815 Campaign, and who also would like a game that doesn't require weeks to set up or to play, this title is probably a MUST OWN.
Design Characteristics:
- Time Scale: 1 hour per game turn (daylight turns); 3 hours per game turn (night turns)
- Map Scale: 480 meters per hex
- Unit Size: Each strength point represents 350-750 men or 1 battery of artillery (6 to 14 guns)
- Unit Types: army commanders (e.g., Napoleon, Wellington, and Blücher), officers (mainly corps commanders), infantry, cavalry, foot artillery, and horse artillery
- Number of Players: two (the Campaign Game, however, is a possible candidate for team play)
- Complexity: average
- Solitaire Suitability: above average
- Average Playing Time: 2-3 hours (depending on scenario); 15+ hours for the Campaign Game
Game Components (for all four Games):
- Four 17” x 22” hexagonal grid Map Sheets (with Unit Starting Positions, Turn Record Chart and Terrain Key incorporated)
- 400 ½” back-printed cardboard Counters
- Two 8½” x 11” Standard Rules Booklets (with Individual Scenario Instructions and Terrain Effects Chart incorporated)
- Two 8½” x 11” Campaign Rules Booklets (with Additional Campaign Instructions and Unit Manifest incorporated)
- One small six-sided Die
- One SPI 12” x 15” x 1” flat 24 compartment plastic Game Box (with clear compartment tray covers) and clear plastic box cover with Title Sheet
Recommended Reading
See my blog post Book Reviews of Waterloo, Day of Battle, and The Campaigns of Napoleon and The Face of Battle; books that I recommend as highly-readable sources for those visitors who are interested in further historical background.
For decorating the game room with a Napoleonic theme:
Read On
THE BATTLE OF LOBOSITZ is a grand-tactical simulation of the clash between a force of over twenty-four thousand Prussians, under Frederick the Great, and a larger Austrian army, led by Marshal von Browne, near the Saxon town of Lobositz in October of 1756. The game was designed by Frank Chadwick and published by Game Designers’ Workshop (GDW) in 1978. LOBOSITZ is one of a whole batch of different titles that, taken together, make up GDW’s Series 120 collection of small, folio-style introductory games. These Series 120 titles were described by GDW as “gateway” games because they were intended to be easy to learn, used 120 or fewer counters, and could typically be played to completion in two hours (120 minutes) or less.
HISTORICAL BACKGROUND
![]() |
| Frederick the Great during the Seven Years War. |
The Battle of Lobositz — sometimes referred to as the first battle of the “Seven Years’ War” — was the result of Frederick’s invasion of the Electorate of Saxony and his decision to besiege the Saxon Army of approximately 17,000 in Pirna. Saxony’s ally, Austria — ruled by the militarily-savvy Empress Maria Theresa — quickly responded by ordering that a relief force be assembled and dispatched, under the command of Marshal Maximilian von Browne, to the Saxons’ aid. Frederick learned of the Austrian advance and split his army, leaving one part to continue the siege while he personally led the rest of his troops (estimates vary widely, but this contingent probably numbered between 24,000 and 29,000 men) on a march to intercept Marshal von Browne and his nearly 35,000 Austrians.
The two belligerents stumbled into each other near Lobositz, a town on the banks of the Elbe River, early on the morning of 1 October, 1756. At first, contact between the two forces was sporadic and relatively light. The Prussian army, which was approaching Lobositz from the west, initially received fire from its left (the area of the Lobosch Heights), and the limited nature of this action led Frederick to think that he had encountered a small Austrian rearguard. Visibility was poor — a thick morning fog made an accurate assessment of the enemy’s dispositions impossible — however, as the volume of fire increased and spread to his front, the Prussian monarch, who was still convinced that he faced an inferior force, ordered his cavalry forward to determine the strength and intentions of the enemy troops in his path. What Frederick’s horsemen discovered was an unpleasant surprise to the Prussian king: a large Austrian field army, instead of a small blocking force, was deployed in a defensive north-south arc across the Prussian army’s entire front. This arc stretched from the Lobosch heights in the north, passed in front of the town of Lobositz, and then continued south to the marshes near the hamlet of Sullowitz on Frederick’s right. The Austrian defensive position, although not perfect — von Browne’s line south of Lobositz was bisected by a shallow stream, the Morellenbach — was still strongly situated with the Elbe River and Lobositz anchoring the Austrian right while Sullowitz and a combination of marshland and forest covered von Browne’s left.
![]() |
| Marshal Maximilian von Browne |
Not surprisingly, given his initial misappraisal of the situation before him, the battle did not begin particularly well for Frederick. The fog hampered most of the Prussian king’s initial offensive moves against the Austrians, and also limited the effectiveness of his artillery. As the morning mist gradually cleared, however, the Prussians slowly began to gain the upper hand in the fighting around Lobositz. Finally, after being repeatedly repulsed, the Prussian infantry was at last able to storm the town at bayonet point: a success that forced the Austrian center to fall back. The Battle of Lobositz lasted most of the day, but finally ended when von Browne, having lost ground on his right and center, decided to withdraw his army from the field; which he did in good order.
Lobositz was far from Frederick’s finest battle. In fact, early in the day, after having lost heavily from among his best cavalry formations, the Prussian king actually thought that the action might be lost and considered abandoning the field to von Browne’s forces. Fortunately for Frederick, the discipline and élan of the magnificent Prussian infantry retrieved the situation before he could make any additional mistakes. Both sides lost about 3,000 men, but von Browne’s withdrawal left the Saxon garrison at Pirna with no option but to surrender, and (as was typical of the times) transfer their allegiance and service to Frederick and Prussia.
DESCRIPTIONTHE BATTLE OF LOBOSITZ is a grand tactical (regiment/brigade/wing) simulation of the battle between 24-29,000 Prussians, led by Frederick the Great, and an Austrian army of 34,000, under Marshal Maximilian von Browne, which took place on the banks of the Elbe River in and around the Saxon town of Lobositz on 1 October, 1756.
The LOBOSITZ game map is a three-color, hexagonal grid depiction of the area in Saxony (now part of the Czech Republic) over which the battle was fought. Each hex is 300 yards from side to side. In keeping with the game’s “introductory level” design parameters, the number of significant terrain types displayed on the game’s Terrain Key is fairly limited; however, the nine different terrain types represented (e.g., town, stream, forest, different elevations, swamp, etc.) all affect, to varying degrees, either movement or combat. Interestingly, the game begins with the battle area shrouded in fog; as the game turns tick off, this fog will gradually dissipate, beginning at the higher elevations and gradually burning-off until the main battlefield is clear. Not surprisingly, fog affects both movement and combat. In addition, certain hexes on the map are marked purely for easy set-up: players may deploy their forces as they wish, but only so long as their respective set-up hexes are occupied by at least one friendly unit of some sort. Also, some stacking is allowed. To simulate the confusion and uncertainty of the early part of the battle, all units that are covered by fog are inverted until an enemy counter moves adjacent to them. The differently-colored counters (mainly blue for Prussia and white for Austria) represent the infantry, cavalry, and artillery units that actually took part in the historical battle. As might be expected, all combat units display both a combat factor and movement allowance; in addition, all units, EXCEPT artillery batteries, also display a morale rating (more on this later) in their upper left-hand corner. As units engage with the enemy, these starting values will change. In LOBOSITZ, casualties are handled using a modified “step-loss” system; which is to say: as units suffer combat losses, their combat strength and morale rating are both reduced; this adjusted strength is represented by placing a numerical chit under the affected unit to record the change.
LOBOSITZ is played in “Igo-Ugo” game turns, and each game turn represents 30 minutes of real time. An individual game turn is composed of a Prussian followed by an Austrian player turn and sticks to a set sequence of player actions: the Movement phase (the active player moves any or all of his eligible units); the Rally phase (the active player rolls to rally any of his demoralized units); the Offensive Fire phase (the acting player fires any units that did not move during this turn’s movement phase); the Defensive Fire phase (the non-phasing player conducts fire attacks against any enemy units within range); and the Mêlée phase (the phasing player conducts adjacent mêlée attacks in those cases in which both the attacker and defender have passed their pre-mêlée “morale checks”. The game is 16 turns (eight hours in real time) long.
Combat in LOBOSITZ, as already alluded to, can take one of two forms: fire combat and mêlée combat. Each type follows its own unique combat resolution procedures, and each has its own influence on the flow and “feel” of the game.
In the case of fire attacks, only infantry units adjacent to an enemy hex and/or artillery with an unobstructed “line of sight” that extends four hexes or less to the target may participate in this type of combat; cavalry may NEVER attack using fire. Much like SPI’s GRENADIER, the resolution of fire attacks is based on the type of terrain in the defender’s hex and not the target unit’s combat strength; in addition, several other factors (such as type of unit) may also affect the outcome of a fire attack via the game mechanism of “die roll modifiers” (DRMs). The Fire Combat Results Table (CRT) is a simple “fire strength/die roll” matrix, and combat results can range (depending on the fire strength of the attacker) all the way from a “no effect” result to a loss of four strength points. These losses, which affect both the target unit’s combat power and its morale rating, are recorded through the use of chits. For example, if a combat unit whose starting strength is two or more suffers a one point loss as a result of a fire attack, a numerical counter of the appropriate value (in this case a “1”) is placed under the affected unit to indicate that its combat strength and morale rating have both been reduced. [This, by the way, brings up one of my main complaints about this game: when the fight for Lobositz shifts to “high gear” in the later game turns, there often aren’t enough strength and “demoralization” chits included in the counter-mix to keep track of both sides’ combat losses.] Once a unit’s combat power falls below its printed strength, it is permanently removed from play.
Fire combat, important as it is, actually plays a supporting role when it comes to victory or defeat in LOBOSITZ. Instead, the real focus of Chadwick’s game is on mêlée combat; this is because it is only by close assault that an attacking force can actually break a defender’s position and capture enemy-occupied ground. The procedures associated with the Mêlée Combat phase are relatively simple, but — because of the role played by morale — interesting, nonetheless. Mêlée combat begins with the attacker rolling for each unit that will attempt to assault during the current mêlée phase. If his die roll is equal to or less than the unit’s current morale rating (essentially allowing the attack to go forward), then the defender must conduct his own morale die roll (except in the case of artillery which has no morale rating). If the attacker’s “morale check” fails then no further action occurs; however, if the defending unit fails with its “morale check” (defending infantry, by the way, suffers a +1 DRM penalty), then it loses a point, becomes demoralized, and then routs towards the nearest friendly map edge. In those cases in which both sides successfully pass their morale checks, the attacker and defender then each total up the current (adjusted for previous combat) strength and morale ratings of their involved units and both roll a single six-sided die. The combat strength and morale value of the attacking and defending units are each added to their respective die rolls and the player with the higher (after all adjustments) total number wins the combat. In cases of a tie, the combat is rerolled until there is a winner and a loser. Whichever side loses the mêlée (whether attacker or defender) must follow exactly the same sequence of actions as a defending unit that fails its “morale check”. To add to the loser’s woes, any unit whose hex is passed through by a routing unit also becomes demoralized, and routs in turn. Needless-to-say, in a congested section of the front, one or two demoralization results can quickly produce a “snowball” effect. And there’s more: once a unit becomes demoralized, it can only be stopped from continuing to rout towards the map edge if the owning player, during the Rally phase, is able to roll a number equal to or lower than its combat-adjusted morale rating; since the LOBOSITZ game map is relatively small, what this really means is that neither player will have more than a few game turns to rally his or her demoralized troops before they disappear from play forever.
![]() |
| Battle of Lobositz. |
Besides the elements that make up the basic LOBOSITZ game platform, Frank Chadwick also includes a few rules flourishes that — in my opinion, at least — really help to enhance the “historical” flavor of this otherwise relatively uncluttered design. The masking effect of fog, for example, has already been noted, but the dramatic impact of fog on the power of the game’s artillery units is worth discussing as well. For starters, until the fog lifts, artillery batteries, like infantry units, are only allowed to fire at adjacent hexes. And while I am on the subject of the game’s heavy guns, the designer’s treatment of artillery “range attenuation” is also interesting; which is to say: artillery is tripled at pointblank range (grapeshot, anyone?); doubled at two and three hexes; and only fires with its standard (printed) strength when it is four hexes from its target. Moreover, the artillery “line-of-sight” rules, although simple, often play an important role in the game, particularly when it comes to the hex-by-hex fight for Lobositz. In this particular instance, Frederick’s army will usually be able to blast the enemy infantry out of the exposed, outer precincts of Lobositz with their heavy guns; however, when it comes to clearing the Austrians from the rest of the town, the Prussian infantry — as was the case in the actual battle — will have to drive Marshal von Browne’s troops out at bayonet point. In addition, there are a number of other minor, but colorful rules, that I also find appealing. For instance, in LOBOSITZ it is more costly, in movement points, for ordered cavalry to move downhill than to move up: this is a nice touch because, in point of fact, it really is much more difficult to keep horses “in hand” when riding down a slope than when climbing one. The Croatian “skirmisher” battalions, and their several special capabilities, are another interesting touch. And finally, the movement restrictions on the Austrian left wing south of Lobositz — restrictions which prevent these troops from shifting north until Prussian units advance across the field to the Morellenbach — is a simple, but effective way of simulating Marshal von Browne’s initial uncertainty as to Frederick’s dispositions and plans.
When it comes to winning or losing THE BATTLE OF LOBOSITZ — as was the case historically — the burden of attack is squarely on the Prussian player; the Austrian commander only has to deny Frederick a significant battlefield success, not win one of his own. The good news for the Prussian player, such as it is, is that there are actually several different ways for Frederick to win the game. If the Prussian army manages, for instance, to sweep the map completely clear of Austrian units — something, by the way, that I have never seen — then the Prussians gain a (richly-deserved) decisive victory. More attainable, but still quite challenging for the Prussian player — in my view, at least — is the modest tactical victory that Frederick actually obtained in the real battle. Unfortunately, to accomplish even this limited success, the Prussians must capture, from the Austrians defending them, both the Lobosch Heights and every one of the hexes (eleven in all) that make up the town of Lobositz. And they must do all this in the face of a powerful enemy force, a blinding morning fog, and a limited number of game turns.
A PERSONAL OBSERVATIONLOBOSITZ is one of two Series 120 games, designed by Frank Chadwick, which cover battles from the Seven Years’ War. The other half of the pair, THE BATTLE OF PRAGUE, simulates a much smaller action between the Prussians and Austrians that occurred on 6 May 1757 near the city of the title. Both games use the same relatively simple, grand-tactical game platform. In terms of play-balance, LOBOSITZ tends to lean towards the Austrians, while PRAGUE — unless I’m missing something important — heavily favors the Prussians. These games, it should be noted, are not Chadwick’s first attempts to simulate the special nature of 18 th century warfare during the age of Frederick the Great: his larger and much more detailed TORGAU had already appeared a full four years earlier, in 1974. And although the two battles depicted in these later, smaller games are both modestly interesting from a historical standpoint, an obvious question, nevertheless, presents itself: Why did GDW choose to feature these two relatively obscure engagements and not a pair of more famous battles such as Rossbach and/or Leuthen?
One possible answer, of course, is that — at the time he began work on these two Series 120 games — Frank Chadwick actually had plans to design larger, more detailed TORGAU-style simulations of some of Frederick’s other, better-known battles at some later date. Such a possibility is certainly plausible; after all, the Battle of Leuthen, as Paul Dangel proved with his superb Clash of Arms game design, LEUTHEN: FREDERICK’S GREATEST VICTORY (1997), turned out to be, in the hands of the right person, an excellent wargame just waiting to be developed. For my own part, however, I have a sneaky suspicion that the designer’s decision to simulate this particular set of actions ( LOBOSITZ and PRAGUE) was probably dictated more by the special requirements of the Series 120 design format than by any other factors. Still and all, whatever Chadwick’s original plans may have been for simulating some of the other battles of Frederick II ndof Prussia using this clever, but relatively simple game platform: three decades later, we are still left with only PRAGUE and LOBOSITZ to consider; so I think that it is probably safe to assume that Frank has moved on to other things.
Since we, on the other hand, are at least temporarily focused on this early Chadwick design, I will attempt to move things along by raising an obvious, if rhetorical question: How does THE BATTLE OF LOBOSITZ look now, after having bumped around in relative obscurity for over thirty years? My short answer is that — all things considered — it really doesn’t look all that bad. Admittedly, the graphics for LOBOSITZ — as was typical of virtually all GDW games during this era — are neither especially evocative of the battle’s historical period (see AGINCOURT for a particularly egregious example of this) or even all that interesting to the eye, the “ugly duckling” appearance of this title conceals a surprisingly nicely-done “swan” of a grand-tactical game engine. That being said, LOBOSITZ is not, despite its Series 120 pedigree, really a “gateway” wargame in the same sense, for example, that SPI’s many NAPOLEON AT WATERLOO-based titles are. To be fair, the game is not especially difficult to learn if the prospective player understands at least something about conflict simulations. Nonetheless, I personally do not believe that any wargame which incorporates a multi-stage combat subroutine, elevation differences, “line-of-sight” rules, morale, and step-reduction should ever really be described — by me or anyone else — as an “introductory” game. That being said, and in spite of its somewhat denser than expected design architecture, I do think that LOBOSITZ would be readily accessible to almost any player with even a modest amount of gaming experience. Thus, while I would never recommend this particular title — or most of its Series 120 cousins, for that matter — as an “introductory” game suitable for an absolute novice, I do think that it is an excellent choice for more seasoned gamers of almost any stripe. Particularly if those players are interested in the campaigns of Frederick the Great, but don’t want to spend an entire day refighting one of his battles: which, based on my own previous experiences, is always a distinct possibility when it comes to tackling more sophisticated games like COAG’s LEUTHEN, or GDW’s TORGAU.
Design Characteristics:- Time Scale: 30 minutes per game turn
- Map Scale: 300 yards per hex
- Unit Size: battalion/regiment/brigade/wing/battery
- Unit Types: infantry, cavalry, artillery
- Number of Players: two
- Complexity: average
- Solitaire Suitability: below average
- Average Playing Time: 1.5 - 2 hours
Game Components:- One 17” x 22” hexagonal grid Map Sheet (with Turn Record Track and Terrain Key incorporated)
- 120 ½” cardboard Counters
- One 8½” x 11” Rules Booklet (with Fire Combat Results Table and Terrain Effects Chart incorporated)
- One 9¼” x 12” Ziploc Bag
Related Reading
Read On
|




 Posts
Posts